About PgOSM Flex
PgOSM Flex (GitHub) provides high quality OpenStreetMap datasets in PostGIS using the osm2pgsql Flex output. This project provides a curated set of Lua and SQL scripts to clean and organize the most commonly used OpenStreetMap data, such as roads, buildings, and points of interest (POIs).
Running PgOSM Flex is easy via the PgOSM Docker image hosted on Docker Hub.
- The quick start shows how easy it is to get started
- Change how PgOSM Flex runs with common customizations
- Customize layersets to change what data you load
- Configure connection to external database, and use replication
Project goals
- High quality spatial data
- Reliable
- Easy to customize
- Easy to use
Project decisions
A few decisions made in this project:
- ID column is
osm_idand is alwaysPRIMARY KEY - Geometry column named
geom - Defaults to same units as OpenStreetMap (e.g. km/hr, meters)
- Data not included in a dedicated column is available from
osm.tags.tags(JSONB) - Points, Lines, and Polygons are not mixed in a single table
- Tracks latest Postgres, PostGIS, osm2pgsql, and pgRouting versions
This project's approach is to do as much processing in the Lua styles passed along to osm2pgsql, with post-processing steps creating indexes, constraints and comments.
Minimum Versions Supported
This project will attempt, but not guarantee, to support each major PostgreSQL version until it reaches it EOL support.
The Docker image is pinned to osm2pgsql's master branch. Users of the Docker image
naturally use the latest version of osm2pgsql at the time the Docker image was created.
This project runs entirely in Docker, optionally connecting to an external Postgres instance at runtime. It should work on any typical OS able to run Docker.
Minimum Hardware
RAM
osm2pgsql requires at least 2 GB RAM.
Storage
Fast SSD drives are strongly recommended. It should work on slower storage devices (HDD, SD, etc), however the osm2pgsql-tuner package used to determine the best osm2pgsql command assumes fast SSDs.
RustProof Labs project
PgOSM Flex is a RustProof Labs project developed and maintained by Ryan Lambert and contributors. See the RustProof Labs blog for more resources and examples of using PgOSM Flex.
PgOSM Flex Community Code of Conduct
Why have a Code of Conduct?
Online communities include people from many different backgrounds. The PgOSM Flex contributors are committed to providing a friendly, safe and welcoming environment for all, regardless of age, disability, gender, nationality, ethnicity, religion, sexuality, or similar personal characteristic.
The first goal of the Code of Conduct is to specify a baseline standard of behavior so that people with different social values and communication styles can talk about PgOSM Flex effectively, productively, and respectfully.
The second goal is to provide a mechanism for resolving conflicts in the community when they arise.
The third goal of the Code of Conduct is to make our community welcoming to people from different backgrounds. Diversity is critical to the project; for PgOSM Flex to be successful, it needs contributors and users from all backgrounds.
With that said, a healthy community must allow for disagreement and debate. The Code of Conduct is not a mechanism for people to silence others with whom they disagree.
Where does the Code of Conduct apply?
If you participate in or contribute to the PgOSM Flex ecosystem in any way, you are encouraged to follow the Code of Conduct while doing so.
Explicit enforcement of the Code of Conduct applies to the PgOSM Flex GitHub project and code reviews.
Values
These are the values to which people in the PgOSM Flex should aspire.
- Be friendly and welcoming
- Be patient
- Remember that people have varying communication styles and that not everyone is using their native language. (Meaning and tone can be lost in translation.)
- Be thoughtful
- Productive communication requires effort. Think about how your words will be interpreted.
- Remember that sometimes it is best to refrain entirely from commenting.
- Be respectful
- In particular, respect differences of opinion.
- Be charitable
- Interpret the arguments of others in good faith, do not seek to disagree.
- When we do disagree, try to understand why.
- Avoid destructive behavior:
- Derailing: stay on topic; if you want to talk about something else, start a new conversation.
- Unconstructive criticism: don't merely decry the current state of affairs; offer—or at least solicit—suggestions as to how things may be improved.
- Snarking (pithy, unproductive, sniping comments)
- Discussing potentially offensive or sensitive issues unless directly technically relevant; this all too often leads to unnecessary conflict.
- Microaggressions: brief and commonplace verbal, behavioral and environmental indignities that communicate hostile, derogatory or negative slights and insults to a person or group.
People are complicated. You should expect to be misunderstood and to misunderstand others; when this inevitably occurs, resist the urge to be defensive or assign blame. Try not to take offense where no offense was intended. Give people the benefit of the doubt. Even if the intent was to provoke, do not rise to it. It is the responsibility of all parties to de-escalate conflict when it arises.
Unwelcome behavior
These actions are explicitly forbidden in PgOSM Flex spaces:
- Insulting, demeaning, hateful, or threatening remarks.
- Discrimination based on age, disability, gender, nationality, ethnicity, religion, sexuality, or similar personal characteristic.
- Bullying or systematic harassment.
- Revealing private information about other participants without explicit permission ("doxxing").
- Unwelcome sexual advances.
- Incitement to any of these.
Moderation
The PgOSM Flex spaces are not free speech venues; they are for discussion about PgOSM Flex.
When using the PgOSM Flex spaces you should act in the spirit of the values. If you conduct yourself in a way that is explicitly forbidden by the CoC, you will be warned and asked to stop. If you do not stop, you will be removed from our community spaces temporarily. Repeated, willful breaches of the CoC will result in a permanent ban.
Reporting issues
The PgOSM Flex maintainers are responsible for handling conduct-related issues. Their goal is to de-escalate conflicts and try to resolve issues to the satisfaction of all parties.
If you encounter a conduct-related issue, you should report it to the maintainers by sending them an email. In the event that you wish to make a complaint against a maintainer, you may instead contact the other maintainers.
Note that the goal of the Code of Conduct and the maintainers is to resolve conflicts in the most harmonious way possible. We hope that in most cases issues may be resolved through polite discussion and mutual agreement. Bans and other forceful measures are to be employed only as a last resort.
Changes to the Code of Conduct should be proposed as pull requests.
Summary
- Treat everyone with respect and kindness.
- Be thoughtful in how you communicate.
- Don’t be destructive or inflammatory.
- If you encounter an issue, please mail the maintainers.
Acknowledgements
This document is based on the OpenStreetMap Carto Code of Conduct, which in turn has parts derived from the Code of Conduct documents of the Go Community, Django, FreeBSD, and Rust projects.
This document is licensed under the Creative Commons Attribution 3.0 License.
Contributing
Thank you for your interest in contributing to PgOSM Flex!
All types of contributions are encouraged and valued. This page outlines different ways you can contribute with details about how this project handles them. Please make sure to read the relevant sections below before making your contribution. This makes it much easier for maintainers and smooths out the experience for everyone involved.
The PgOSM Flex community looks forward to your contributions. 🎉
If you like the project, but do not have time to contribute directly, that is fine. There are other easy ways to support the project and show your appreciation, which we would also be very happy about:
- Star the project on GitHub.
- Blog or otherwise post about it on the social media of your choice.
- Refer to this project in your project's readme.
- Tell your friends / colleagues.
- Mention the project at local meetups.
Code of Conduct
This project and everyone participating in it is governed by the Code of Conduct. By participating, you are expected to uphold this code. Please report unacceptable behavior to the maintainers.
Ways to Contribute
The PgOSM Flex project is managed on GitHub. GitHub provides multiple ways to interact with and contribute to this project, including discussions, issues, and pull requests (PRs). A GitHub account is required for many interactions with the community, such as creating issues, leaving comments, and many other actions available through GitHub. The following sections explain various ways to use these GitHub features to contribute and otherwise interact with the community.
Discussions: Questions, Ideas, Show & Tell
Before asking a question, search for existing discussions and issues that might address your question. If you find a suitable item yet still need clarification, write your question as a comment on the existing item to keep the discussion in a consolidated location. It is also advisable to search this documentation and the internet for answers first.
If your question is not already being addressed, start a new Discussion with as much context and detail as possible. GitHub provides discussion types for Q & A, Discussions, Show and Tell and more. If a question turns into the discovery of a bug or feature request, Discussions can be converted into issues.
List Your Project
The PgOSM Flex project encourages you to list your project using PgOSM Flex. The easiest way to start this is to open a Show and Tell discussion. Explain how PgOSM Flex is used in your project, if you have a blog post or other easy ways to show this, make sure to add links!
Issues: Enhancements and Bugs
This section guides you through submitting GitHub issues for PgOSM Flex. Issues are used to suggest completely new features, minor improvements, and report bugs.
Following these guidelines will help maintainers and the community understand your suggestion and make PgOSM Flex as useful and bug-free as possible.
Before Submitting an Issue
- Make sure that you are using the latest version.
- Read the documentation to see if your topic is already covered
- Search existing isues to see if there is already an open issue on the topic. If there is an existing issue, add a comment there instead of opening a new issue.
- Find out whether your idea fits with the scope and aims of the project. It's up to you to make a strong case to convince the project's developers of the merits of this feature. Keep in mind that we want features that will be useful to the majority of our users and not just a small subset. If you're just targeting a minority of users, consider writing an add-on/plugin library.
Feature Request
Feature requests are tracked as GitHub issues.
- Use a clear and descriptive title for the issue to identify the suggestion.
- Provide a step-by-step description of the suggested enhancement in as many details as possible.
- Describe the current behavior and explain which behavior you expected to see instead and why. At this point you can also tell which alternatives do not work for you.
- Explain why this enhancement would be useful to PgOSM Flex users.
Bug Report
A bug report indicates PgOSM Flex is not working as advertised or expected. Use the bug report template to submit your issue. Fill in detailed information for as many of the sections as possible.
The bug report template includes a series of headers
(defined as lines starting with # symbols) with comments prompting you for input.
Use the "Write" and "Preview" tabs in the GitHub interface to edit and preview your issue.
- Make sure that you are using the latest version.
- Make sure that you have read the documentation.
- Determine if your bug is really a bug and not an error on your side e.g. using incompatible environment components/versions.
- To see if other users have experienced (and potentially already solved) the same issue you are having, check if there is not already a bug report existing for your bug or error in the issues.
Security Advisory
Security related concerns should be submitted using GitHub's Security Advisory feature. This provides a secure method to communicate with project maintainers.
RustProof Labs makes security a top priority and will address any security concerns as quickly as possible.
Once it's submitted
After you have submitted an issue, the project team will label the issue accordingly. Maintainers will try to reproduce the issue with your provided steps. If there are no reproduction steps or no obvious way to reproduce the issue, the team will ask you for more details.
Improving Documentation
See the README.md in the pgosm-flex/docs directory.
Submitting Pull Requests
This project uses Pull Requests (PRs) like so many other open source projects.
Fork the project into your own repository, create a feature branch there,
and make one or more pull requests back to the main PgOSM Flex repository
targeting the dev branch. Your PR can then be reviewed and discussed.
Helpful: Run
makein the project root directory and ensure all tests pass. If tests are not passing and you need help resolving the problem, please mention this in your PR.
Adding new feature layers
Feature Layers define the data loaded by PgOSM Flex into the target Postgres / PostGIS database.
Checklist for adding new feature layers:
-
Create
flex-config/style/<feature>.lua -
Create
flex-config/sql/<feature>.sql -
Update
flex-config/run.lua -
Update
flex-config/run.sql -
Update
db/qc/features_not_in_run_all.sql -
Add relevant
tests/sql/<feature_queries>.sql -
Add relevant
tests/expected/<feature_queries>.out
Style guides
Written content in GitHub
See GitHub's Markdown documentation for more on writing with formatting in GitHub.
- Use headers to outline sections when using more than two or three paragraphs.
- Format
codewhen using with inline text. - Use code blocks for multi-line code examples.
Commit Messages
Brief, descriptive commit messages are appreciated. Lengthy commit messages will likely never be reviewed. Detailed explanations and discussions are appropriate in GitHub Pull Request, Issues, and/or discussions.
Legal Notice
When contributing to this project, you must agree that you have authored 100% of the content, that you have the necessary rights to the content and that the content you contribute may be provided under the project license.
Attribution
This guide is loosely based on the example contributing.md site.
Quick Start
The bulk of the PgOSM Flex user guide is written for *nix users.
The Quick Start, however, includes an additional section Running on Windows
provides guidance for Windows users. Windows users are advised to read
this section before continuing to the Windows specific steps, as many concepts
are not repeated in the Windows instructions.
TLDR;
The following code block shows the commands needed to run PgOSM Flex. The sections below provide explanations of these commands.
mkdir ~/pgosm-data
export POSTGRES_USER=postgres
export POSTGRES_PASSWORD=mysecretpassword

# Ensure you have the latest Docker image
docker pull rustprooflabs/pgosm-flex

docker run --name pgosm -d --rm \
    -v ~/pgosm-data:/app/output \
    -v /etc/localtime:/etc/localtime:ro \
    -e POSTGRES_USER=$POSTGRES_USER \
    -e POSTGRES_PASSWORD=$POSTGRES_PASSWORD \
    -p 5433:5432 -d rustprooflabs/pgosm-flex

docker exec -it \
    pgosm python3 docker/pgosm_flex.py \
    --ram=8 \
    --region=north-america/us \
    --subregion=district-of-columbia
PgOSM via Docker
The PgOSM Flex Docker image is hosted on Docker Hub. The image includes all the pre-requisite software and handles all of the options, logic, and post-processing steps required. Features include:
- Automatic data download from Geofabrik and validation against checksum
- Custom Flex layers built in Lua
- Mix and match layers using Layersets
- Loads to Docker-internal Postgres, or externally defined Postgres
- Supports
osm2pgsql-replicationandosm2pgsql --appendmode - Export processed data via
pg_dumpfor loading into additional databases
Docker usage
This section outlines a typical import using Docker to run PgOSM Flex.
Prepare
Create a directory to use a common location to share with the Docker container.
This is used to link to the internal path where the .osm.pbf file, .md5 file,
and (optional) output .sql files are saved.
mkdir ~/pgosm-data
Run
Set environment variables for the temporary Postgres connection in Docker. These are required for the Docker container to run.
export POSTGRES_USER=postgres
export POSTGRES_PASSWORD=mysecretpassword
Start the pgosm Docker container. At this point, Postgres / PostGIS
is available on port 5433.
docker run --name pgosm -d --rm \
    -v ~/pgosm-data:/app/output \
    -v /etc/localtime:/etc/localtime:ro \
    -e POSTGRES_PASSWORD=$POSTGRES_PASSWORD \
    -p 5433:5432 -d rustprooflabs/pgosm-flex
Check Docker container running
It is worth verifying the Docker container is successfully running with docker ps -a.
Check for a STATUS similar to Up 4 seconds shown in the example output below.
$ docker ps -a

CONTAINER ID   IMAGE                      COMMAND                  CREATED         STATUS         PORTS                                       NAMES
e7f80926a823   rustprooflabs/pgosm-flex   "docker-entrypoint.s…"   5 seconds ago   Up 4 seconds   0.0.0.0:5433->5432/tcp, :::5433->5432/tcp   pgosm
Execute PgOSM Flex
Use docker exec to run the processing for the Washington D.C subregion.
This example uses three (3) parameters to specify the total system RAM (8 GB)
along with a region/subregion.
- Total RAM for osm2pgsql, Postgres and OS (
8) - Region (
north-america/us) - Sub-region (
district-of-columbia) (Optional)
docker exec -it \
    pgosm python3 docker/pgosm_flex.py \
    --ram=8 \
    --region=north-america/us \
    --subregion=district-of-columbia
The above command takes roughly 1 minute to run if the PBF for today has already been downloaded. If the PBF is not downloaded it will depend on how long it takes to download the 17 MB PBF file + ~ 1 minute processing.
After processing
The processed OpenStreetMap data is also available in the Docker container on port 5433.
You can connect and query directly in the Docker container.
psql -h localhost -p 5433 -d pgosm -U postgres -c "SELECT COUNT(*) FROM osm.road_line;"

┌───────┐
│ count │
╞═══════╡
│ 39865 │
└───────┘
The ~/pgosm-data directory has two (2) files from a typical single run.
The PBF file and its MD5 checksum have been renamed with the date in the filename.
This enables loading the file downloaded today
again in the future, either with the same version of PgOSM Flex or the latest version. The docker exec command uses the PGOSM_DATE environment variable
to load these historic files.
If --pg-dump option is used the output .sql is also saved in
the ~/pgosm-data directory.
This .sql file can be loaded into any other database with PostGIS and the proper
permissions.
ls -alh ~/pgosm-data/

-rw-r--r-- 1 root     root      18M Jan 21 03:45 district-of-columbia-2023-01-21.osm.pbf
-rw-r--r-- 1 root     root       70 Jan 21 04:39 district-of-columbia-2023-01-21.osm.pbf.md5
-rw-r--r-- 1 root     root     163M Jan 21 16:14 north-america-us-district-of-columbia-default-2023-01-21.sql
Meta table
PgOSM Flex tracks processing metadata in the osm.pgosm_flex table. The initial import
has osm2pgsql_mode = 'create', the subsequent update has
osm2pgsql_mode = 'append'.
SELECT osm_date, region, srid,
        pgosm_flex_version, osm2pgsql_version, osm2pgsql_mode
    FROM osm.pgosm_flex
;
┌────────────┬───────────────────────────┬──────┬────────────────────┬───────────────────┬────────────────┐
│  osm_date  │          region           │ srid │ pgosm_flex_version │ osm2pgsql_version │ osm2pgsql_mode │
╞════════════╪═══════════════════════════╪══════╪════════════════════╪═══════════════════╪════════════════╡
│ 2022-11-04 │ north-america/us-colorado │ 3857 │ 0.6.2-e1f140f      │ 1.7.2             │ create         │
│ 2022-11-25 │ north-america/us-colorado │ 3857 │ 0.6.2-e1f140f      │ 1.7.2             │ append         │
└────────────┴───────────────────────────┴──────┴────────────────────┴───────────────────┴────────────────┘
Explore data loaded
A peek at some of the tables loaded.
This query requires the
PostgreSQL Data Dictionary (PgDD) extension,
use \dt+ osm.* in psql for similar details.
SELECT s_name, t_name, rows, size_plus_indexes
    FROM dd.tables
    WHERE s_name = 'osm'
    ORDER BY t_name LIMIT 10;
    ┌────────┬──────────────────────┬────────┬───────────────────┐
    │ s_name │        t_name        │  rows  │ size_plus_indexes │
    ╞════════╪══════════════════════╪════════╪═══════════════════╡
    │ osm    │ amenity_line         │      7 │ 56 kB             │
    │ osm    │ amenity_point        │   5796 │ 1136 kB           │
    │ osm    │ amenity_polygon      │   7593 │ 3704 kB           │
    │ osm    │ building_point       │    525 │ 128 kB            │
    │ osm    │ building_polygon     │ 161256 │ 55 MB             │
    │ osm    │ indoor_line          │      1 │ 40 kB             │
    │ osm    │ indoor_point         │      5 │ 40 kB             │
    │ osm    │ indoor_polygon       │    288 │ 136 kB            │
    │ osm    │ infrastructure_point │    884 │ 216 kB            │
    │ osm    │ landuse_point        │     18 │ 56 kB             │
    └────────┴──────────────────────┴────────┴───────────────────┘
One table to rule them all
From the perspective of database design, the osm.unitable option is the worst!
This table violates all sorts of best practices established in this project
by shoving all features into a single unstructured table.
The Unitable data is loaded with the everything layerset.
Of course, you can create your own customized layerset including this style
if needed.
The
osm.unitabletable is intended to be used for troubleshooting and quality control. It is not intended to be used for production workloads! This table is most helpful for exploring the full data set when you don't really know what you are looking for, but you know where you are looking.
docker exec -it \
    pgosm python3 docker/pgosm_flex.py \
    --ram=8 \
    --region=north-america/us \
    --subregion=district-of-columbia \
    --layerset=everything
The
unitable.luascript included in this project was adapted from the unitable example from osm2pgsql. This version usesJSONBinstead ofHSTORE, and takes advantage ofhelpers.luato easily customize SRID.
JSONB support
PgOSM-Flex uses JSONB in Postgres to store the raw OpenStreetMap
key/value data (tags column) and relation members (member_ids).
The tags column only exists in the osm.tags and osm.unitable tables.
The member_ids column is included in:
osm.place_polygonosm.poi_polygonosm.public_transport_lineosm.public_transport_polygonosm.road_lineosm.road_majorosm.road_polygon
Additional resources
Blog posts covering various details and background information.
- Book Release! Mastering PostGIS and OpenStreetMap
- Better OpenStreetMap places in PostGIS
- Improved OpenStreetMap data structure in PostGIS
- Hands on with osm2pgsql's new Flex output.
PgOSM Flex on Windows
PgOSM Flex can be used on Windows via Docker Desktop. This page outlines a few Windows-specific steps where they deviate from the experience on Linux.
Install Docker Desktop
The Docker documentation has instructions to install Docker Desktop on Windows. There is a link toward the top of that page to download the latest installer. The installation steps are under the Install Docker Desktop on Windows section, with both interactive and command line instructions.
Note: If your Windows user is NOT the admin, you must also follow the steps to add your user to the
docker-usersuser group. Those steps are listed after the main installation steps.
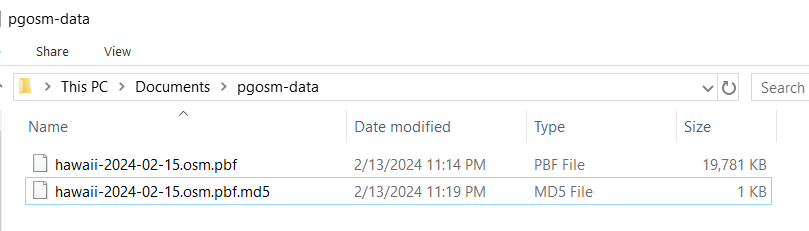
Create Folder
Create a pgosm-data folder under your user's Documents folder. This gives PgOSM Flex
a place to save files that you can access directly from your host Windows machine.
The following screenshot shows this folder with the .pbf and .md5 files downloaded
to load Hawaii from 2024-02-15.
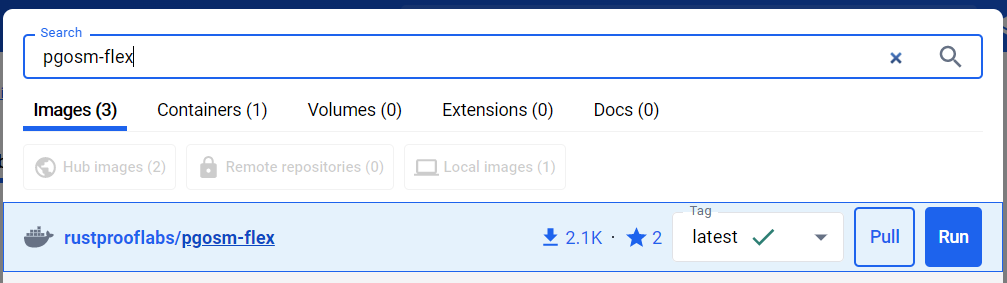
Download PgOSM Flex Image
Search for the rustprooflabs/pgosm-flex Docker image via Docker Desktop.
Leave the "Latest" tag selected and click "Pull" to download the image.
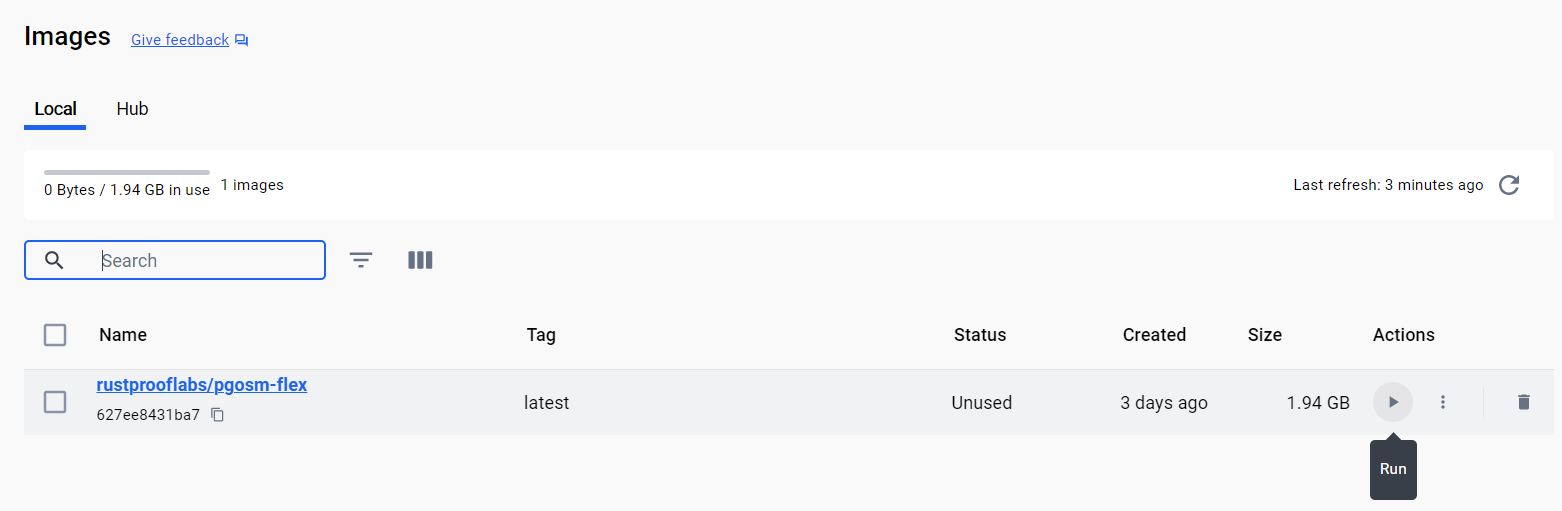
Run Docker Container
The Images section of Docker Desktop lists the images available on your computer. Click the Run button (play icon) on the right side of the line listing the PgOSM Flex image.
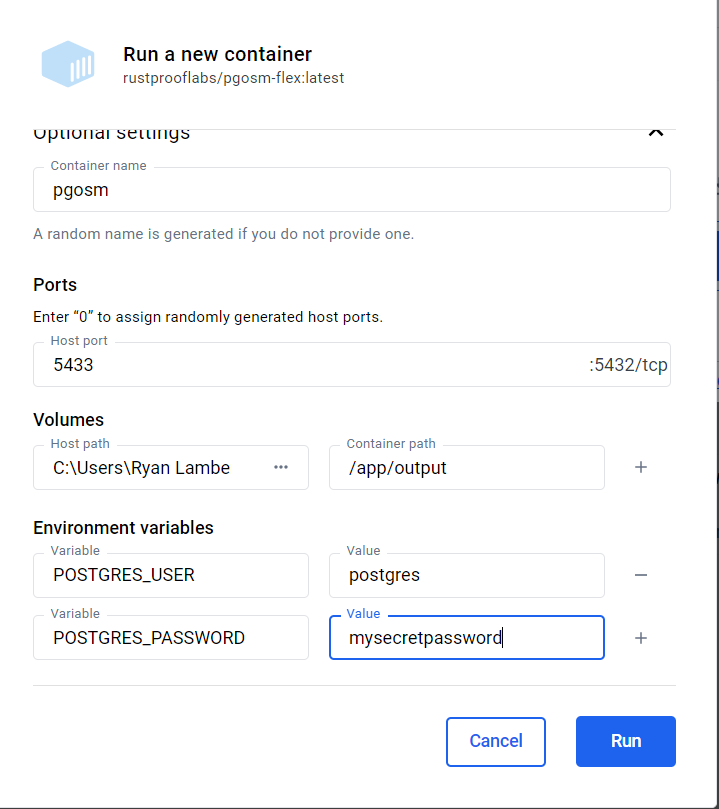
Expand the "Optional Settings" dialog on the Run dialog to enter details to run.
Setting the port to 5433 makes the in-Docker Postgres available to connect to from
your host machine.
The Volumes setting maps your load pgosm-data dirctory (under Documents) to
the Docker container's /app/output directory to make files used available.
The Environment Variables configure the internal database's superuser and password.
DO NOT USE THE PASSWORD SHOWN HERE!
Note: These Windows instructions explain the basic Environment Variables matching the ones used in the main Quick Start guide. There are not equivalent Windows pages for all of the advanced customizations available. For these options, review the main instructions for the command line usage and convert them to the Docker Desktop equivalents.
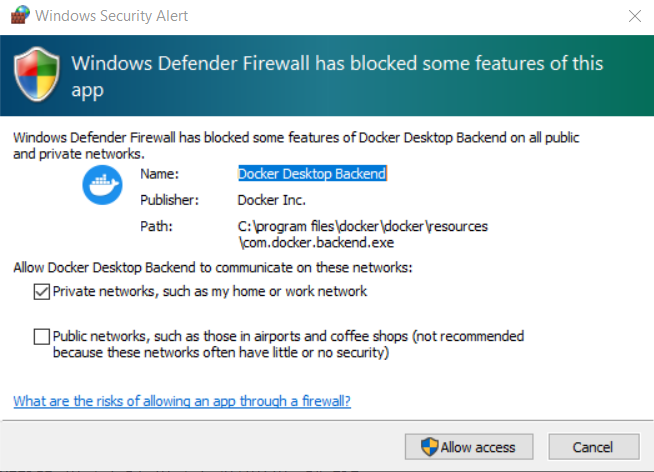
When running the container you might be prompted by Windows Defender about Docker Desktop and the firewall. Most users should click Cancel on this step. You do not need to "Allow access" in order to connect to your Docker container from the computer running Docker.
You should understand the risks of opening up the Postgres port in your firewall. This topic is beyond the scope of this documentation.
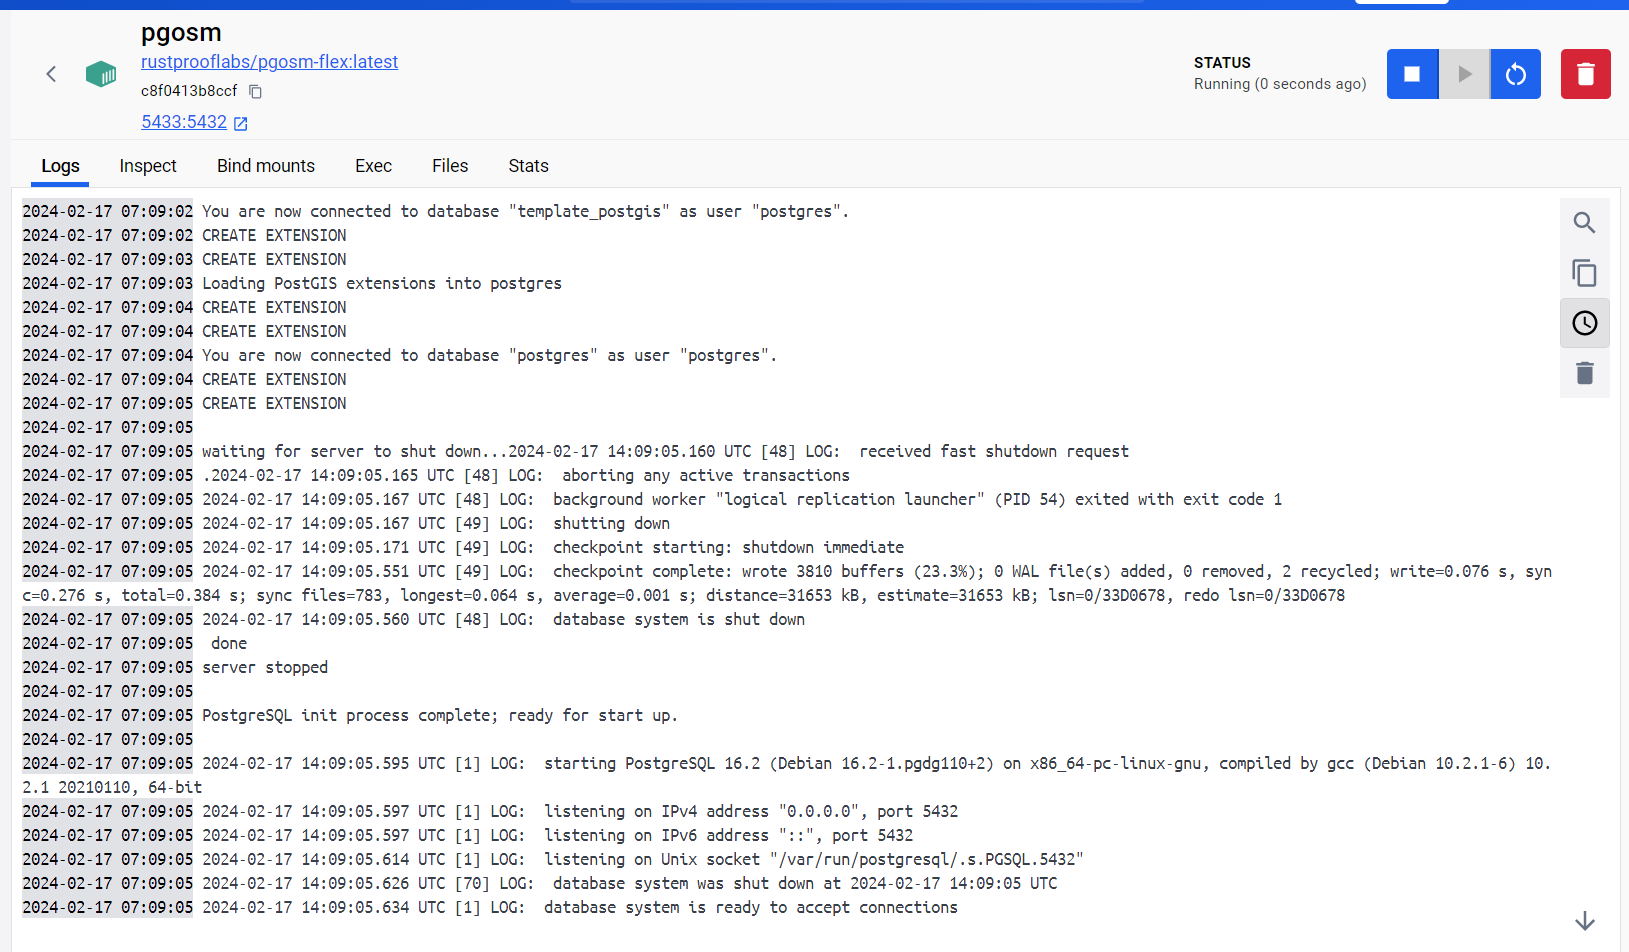
The "Logs" tab for the new running container should display the output from the backend
starting up. The final line from starting up should read
"database system is ready to accept connections." At this point the internal
Postgres service is running and ready.
Docker exec
Switch to the "Exec" tab of the running pgosm container. This interface allows
running commands inside the Docker container. This provides the docker exec -it pgosm
functionality used on the command line elsewhere throughout this documentation.

Enter the command to run in the container.
python3 docker/pgosm_flex.py --ram=2 --region=north-america/us --subregion=hawaii
The following screenshot shows this command being ran and the initial portion of the output from processing.
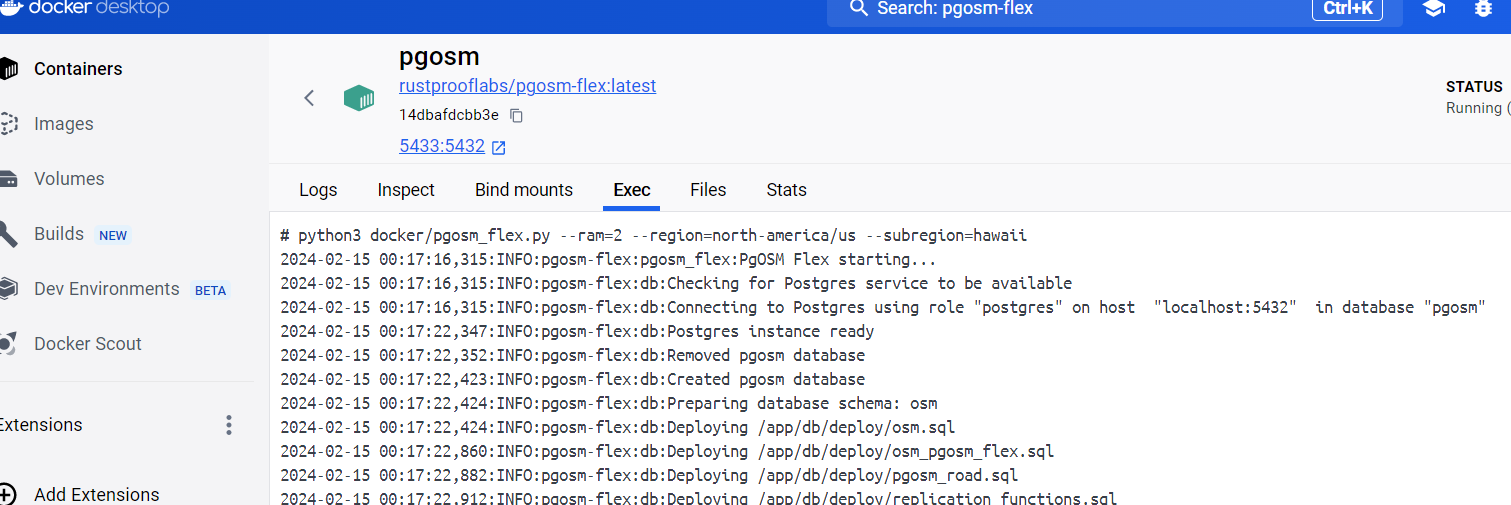
Docker Desktop handles the
execfunctionality. Commands ran via Docker Desktop exclude thedocker exec -it pgosmseen throughout the remainder of this documentation.
Customize PgOSM Flex
Common Customizations
A major goal of PgOSM Flex is support a wide range of use cases for using OpenStreetMap data in PostGIS. This chapter explores a few ways PgOSM Flex can be customized.
Selecting region and subregion
The most used customization is the region and subregion selection.
The examples throughout this project's documentation use
the --region=north-america/us and --subregion=district-of-columbia
because it is a small region that downloads and imports quickly.
docker exec -it \
    pgosm python3 docker/pgosm_flex.py \
    --ram=8 \
    --region=north-america/us \
    --subregion=district-of-columbia
By default PgOSM Flex will attempt to download the necessary data files
from Geofabrik's download server.
Navigate the Region/Sub-region structure on Geofabrik to determine
exactly what --region and --subregion options to choose.
This can be a bit confusing as larger subregions can contain smaller subregions.
Feel free to start a discussion if you need help figuring this part out!
See the Data Files section for steps to change this behavior.
If you want to load the entire United States subregion, instead of
the District of Columbia subregion, the docker exec command is changed to the
following.
docker exec -it \
    pgosm python3 docker/pgosm_flex.py \
    --ram=8 \
    --region=north-america \
    --subregion=us
For top-level regions, such as North America, leave off the --subregion option.
docker exec -it \
    pgosm python3 docker/pgosm_flex.py \
    --ram=8 \
    --region=north-america
Customize load to PostGIS
There are a few ways to customize exactly how data is loaded to PostGIS / Postgres.
SRID
PgOSM Flex defaults to SRID 3857 matching the default osm2pgsql behavior.
This can be customized using --srid 4326 or any other SRID supported by
osm2pgsql and PostGIS.
Schema name
Experimental, added for v0.10.1.
The --schema-name option allows customizing the schema name from the default
of osm. The schema name option allows loading multiple source files into
multiple regions.
While schema name can be customized when using --replication, it
cannot be used to load multiple regions
with replication.
Language
The --language option enables defining a preferred language for OpenStreetMap
names. If --language=en is defined, PgOSM Flex's helper.get_name()
function will use name:en if it exists. The usage and effect
of this option is shown in this comment.
Using -e PGOSM_LANGUAGE=kn for U.S. West results in most state labels picking
up the Kannada language option. The states without a name:kn default
to the standard name selection logic.

Data only
The --data-only option skips creating optional data structures in the target
database. This includes the helper tables in the pgosm schema and the
QGIS layer style table.
Skip nested place polygons
The nested place polygon calculation (explained in this post) adds minimal overhead to smaller regions, e.g. Colorado with a 225 MB PBF input file. Larger regions, such as North America (12 GB PBF), are impacted more severely as a difference in processing time. Calculating nested place polygons for Colorado adds less than 30 seconds on an 8 minute process, taking about 5% longer. A larger region, such as North America, can take 33% longer adding more than an hour and a half to the total processing time. See the performance section for more details.
Use --skip-nested to bypass the calculation of nested admin polygons.
Use --pg-dump to export data
The
--pg-dumpoption was added in 0.7.0. Prior versions defaulted to usingpg_dumpand provided a--skip-dumpoption to override. The default now is to only usepg_dumpwhen requested. See #266 for more.
A .sql file can be created using pg_dump as part of the processing
for easy loading into one or more external Postgres databases.
Add --pg-dump to the docker exec command to enable this feature.
The following example
creates an empty myosm database to load the processed and dumped OpenStreetMap
data.
psql -d postgres -c "CREATE DATABASE myosm;"
psql -d myosm -c "CREATE EXTENSION postgis;"

psql -d myosm \
    -f ~/pgosm-data/pgosm-flex-north-america-us-district-of-columbia-default-2023-01-21.sql
The above assumes a database user with
superuserpermissions is used. See the Postgres Permissions section for a more granular approach to permissions.
Use --help
The PgOSM Docker image can provide command line help.
The Python script that controls PgOSM Flex's behavior is built using the
click module, providing built-in --help.
Use docker exec to show the full help.
docker exec -it pgosm python3 docker/pgosm_flex.py --help
The first portion of the --help output is shown here.
Usage: pgosm_flex.py [OPTIONS]

  Run PgOSM Flex within Docker to automate osm2pgsql flex processing.

Options:
  --ram FLOAT               Amount of RAM in GB available on the machine
                            running the Docker container. This is used to
                            determine the appropriate osm2pgsql command via
                            osm2pgsql-tuner recommendation engine.  [required]
  --region TEXT             Region name matching the filename for data sourced
                            from Geofabrik. e.g. north-america/us. Optional
                            when --input-file is specified, otherwise
                            required.
  --subregion TEXT          Sub-region name matching the filename for data
                            sourced from Geofabrik. e.g. district-of-columbia
  --data-only               When set, skips running Sqitch and importing QGIS
                            Styles.
Layersets
A layerset in PgOSM Flex defines one or more layers, where each layer
includes one or more tables. For example, the
minimal layerset (see flex-config/layerset/minimal.ini)
is defined as shown in the following snippet.
[layerset]
place=true
poi=true
road_major=true
In the above example, place, poi and road_major are the included
Layers. This results in nine (9) total tables being loaded.
There is the standard
meta table osm.pgosm_flex, plus eight (8)
tables for the three (3) layers. The place layer has four tables,
poi has three (3) and road major has one (1).
┌────────┬──────────────────────┬───────┬───────────────────┐
│ s_name │        t_name        │ rows  │ size_plus_indexes │
╞════════╪══════════════════════╪═══════╪═══════════════════╡
│ osm    │ pgosm_flex           │     1 │ 32 kB             │
│ osm    │ place_line           │   128 │ 168 kB            │
│ osm    │ place_point          │   124 │ 128 kB            │
│ osm    │ place_polygon        │   217 │ 496 kB            │
│ osm    │ place_polygon_nested │    22 │ 304 kB            │
│ osm    │ poi_line             │   255 │ 128 kB            │
│ osm    │ poi_point            │ 10876 │ 2360 kB           │
│ osm    │ poi_polygon          │ 12413 │ 6456 kB           │
│ osm    │ road_major           │  8097 │ 2504 kB           │
└────────┴──────────────────────┴───────┴───────────────────┘
Included layersets
PgOSM Flex includes a few layersets to get started as examples.
These layersets are defined under flex-config/layerset/.
If the --layerset is not defined, the default layerset is used.
basicdefaulteverythingminimal
Using a built-in layerset other than default is done by defining
the --layerset option. The following example uses the minimal layerset
shown above.
docker exec -it \
    pgosm python3 docker/pgosm_flex.py \
    --layerset=minimal \
    --ram=8 \
    --region=north-america/us \
    --subregion=district-of-columbia
The output from running PgOSM Flex indicates which layers are being loaded.
2023-01-29 08:47:12,191:INFO:pgosm-flex:helpers:Including place
2023-01-29 08:47:12,192:INFO:pgosm-flex:helpers:Including poi
2023-01-29 08:47:12,192:INFO:pgosm-flex:helpers:Including road_major
Custom layerset
A layerset including the poi and road_major layers would look
like:
[layerset]
poi=true
road_major=true
To use the --layerset-path option for custom layerset
definitions, link the directory containing custom styles
to the Docker container in the docker run command.
If the custom-layerset directory is in the home (~) directory, adding
-v ~/custom-layerset:/custom-layerset \ to the docker run
command will make the layerset definition available to the Docker container.
The custom styles will be available inside the container under
/custom-layerset.
docker run --name pgosm -d --rm \
    -v ~/pgosm-data:/app/output \
    -v /etc/localtime:/etc/localtime:ro \
    -v ~/custom-layerset:/custom-layerset \
    -e POSTGRES_PASSWORD=$POSTGRES_PASSWORD \
    -p 5433:5432 -d rustprooflabs/pgosm-flex
Define the layerset name (--layerset=poi) and path
(--layerset-path) to the docker exec command.
The value provided to --layerset-path must match the path linked in the
docker exec command.
docker exec -it \
    pgosm python3 docker/pgosm_flex.py \
    --layerset=poi \
    --layerset-path=/custom-layerset/ \
    --ram=8 \
    --region=north-america/us \
    --subregion=district-of-columbia
Excluding layers
To exclude layers from a layerset they can be simply omitted from the
.ini file. They can also be set explicitly to false
such as road_major=false.
Layers
This section documents the layers created by PgOSM Flex. The
layerset defined at runtime (to docker exec)
determines which tables are loaded, based on layer_group.
The amenity layer has each of the three types of geometry
commonly associated, so has three tables:
osm.amenity_lineosm.amenity_pointosm.amenity_polygon
The definitive answer to "what is in a layer" is defined by the
associated Lua code under flex-config/style/<layer group>.lua
Layer definitions
The layers are determined by the .lua files available
in the flex-config/style
directory. Each .lua file in the style folder has a matching .sql
file in the flex-config/sql
directory. For example,
the road layer is defined by flex-config/style/road.lua and
flex-config/sql/road.sql, and creates three (3) tables (see Tables section).
Tables
Using --layerset=everything creates 45 tables and one (1)
materialized view. The following table lists the groups of
tables created with the types of layer it is.
| Layer | Geometry Types |
|---|---|
| amenity | line, point, polygon |
| building | point, polygon, combined |
| indoor | line, point, polygon |
| infrastructure | line, point, polygon |
| landuse | point, polygon |
| leisure | point, polygon |
| natural | line, point, polygon |
| place | line, point, polygon, polygon_nested |
| poi | line, point, polygon, combined |
| public_transport | line, point, polygon |
| road | line, point, polygon |
| road_major | line (table name is non-standard, osm.road_major) |
| shop | point, polygon, combined |
| tags | Provides full JSONB tags |
| traffic | line, point, polygon |
| unitable | generic geometry |
| water | line, point, polygon |
Inclusion by OpenStreetMap tags
Data is included in layers based on the tags from OpenStreetMap.
Amenity
OpenStreetMap tags included:
- amenity
- bench
- brewery
Building
OpenStreetMap tags included:
- building
- building:part
- door
- office
Plus: Address only locations.
See issue #97 for more details about Address only locations.
Indoor
OpenStreetMap tags included:
- indoor
- door
- entrance
Infrastructure
OpenStreetMap tags included:
- aeroway
- amenity
- emergency
- highway
- man_made
- power
- utility
Landuse
OpenStreetMap tags included:
- landuse
Leisure
OpenStreetMap tags included:
- leisure
Natural
OpenStreetMap tags included:
- natural
Excludes water/waterway values. See Water section.
Place
OpenStreetMap tags included:
- admin_level
- boundary
- place
POI (Points of Interest)
The POI layer overlaps many of the other existing layers, though with slightly different definitions. e.g. only buildings with either a name and/or operator are included.
OpenStreetMap tags included:
- building
- shop
- amenity
- leisure
- man_made
- tourism
- landuse
- natural
- historic
Public Transport
OpenStreetMap tags included:
- public_transport
- aerialway
- railway
Additional important tags considered, but not used for primary selection:
- bus
- railway
- lightrail
- train
- highway
Road
OpenStreetMap tags included:
- highway
Additional important tags considered, but not used for primary selection:
- maxspeed
- layer
- tunnel
- bridge
- access
- oneway
Shop
OpenStreetMap tags included:
- shop
- amenity
Tags
The osm.tags table stores all tags for all items loaded.
Traffic
OpenStreetMap tags included:
- highway
- railway
- barrier
- traffic_calming
- amenity
- noexit
Unitable
All data is stuffed into a generic GEOMETRY column.
Water
OpenStreetMap tags included:
- natural
- waterway
Uses specific natural types, attempts to avoid overlap
with the Natural layer. See the Natural section.
Views
The need for views is diminishing as PgOSM Flex matures along with osm2pgsql's Flex output.
The materialized view that will likely remain is:
osm.vplace_polygon_subdivide
The other views currently created in PgOSM Flex 0.8.x will be removed in v0.9.0, see issue #320.
osm.vbuilding_allosm.vpoi_allosm.vshop_all
Indexes
PgOSM Flex allows customizing the indexes on the tables using .ini files. The default
index configuration files are stored under flex-config/indexes/.
The default indexing strategy is baked into the Docker
image, to use the defaults you can follow the instructions throughout the
documentation without any adjustments.
Custom indexes added in PgOSM Flex 0.10.0.
Map Volume in docker run
To customize indexes, map the path of your custom index definitions folder
to the Docker container under /app/flex-config/indexes. This overwrites the default
indexing scheme with the custom folder. You must define an INI file for each of
the layers included by your chosen layerset. The easiest approach is to copy the
existing directory with all of the index definitions, then customize those to
your needs.
The following command assumes you have the PgOSM Flex project cloned into the
~/git/pgosm-flex folder. The noindexes example creates the PgOSM Flex
tables with only the required PRIMARY KEYs.
docker run --name pgosm -d --rm \
    -v ~/pgosm-data:/app/output \
    -v /etc/localtime:/etc/localtime:ro \
    -v ~/git/pgosm-flex/flex-config/indexes/examples/noindexes:/app/flex-config/indexes \
    -e POSTGRES_PASSWORD=$POSTGRES_PASSWORD \
    -p 5433:5432 -d rustprooflabs/pgosm-flex
The
lotsofexamplesfolder underflex-config/indexes/examples/illustrates creating indexes on nearly all columns.
INI files
Each Lua style (flex-config/style/*.lua) must have a matching INI file
under flex-config/indexes/. Each .ini file should have 4 sections defined.
These sections can all be empty.
[all]

[point]

[line]

[polygon]
Index settings in the [all] section will apply to all tables in the layer
unless specific tables override the setting. Indexes in the [point], [line],
and [polygon] sections apply to only those specific tables.
The variables to use for indexes are described in the next section.
Index variables
There are three (3) variables that can be configured for each column in the
PgOSM Flex database. <name> is the name of the column in the database.
<name><name>_where<name>_method
See the section Most Columns can be Indexed for details about which columns can be indexed.
To index or not to index
The <name> variable is the column's name and is set to boolean.
To add an index to the admin_level column add admin_level=true. To exclude
an index from a column either omit the column from the definition file, or
set it to false, e.g. admin_level=false.
Partial indexes
Partial indexes can be created with the <name>_where variable.
The admin_level column can have a partial index created on rows where the
admin_level value is set using admin_level_where=admin_level IS NOT NULL.
[all]
admin_level=true
admin_level_where=admin_level IS NOT NULL
Index method
The <name>_method variable can be used to set the index method used by Postgres.
This value is passed to osm2pgsql's method option, which appears to hand off to Postgres. This should
allow any indexing method
supported by Postgres.
One common way to use the <name>_method variable is to change a spatial
column's index from GIST to SPGIST using geom_method=spgist.
GEOMETRY columns default to GIST and all other columns default to BTREE.
[point]
geom=true
geom_method=spgist
See Paul Ramsey's post (The Many) Spatial Indexes of PostGIS for more information about when to choose
SPGIST.
Setting index method isn't limited to spatial indexes. The following example
illustrates adding a BRIN index to the admin_level column.
[all]
admin_level=true
admin_level_method=brin
Most columns can be indexed
The only limit to which columns can be indexed is the index_columns list
defined in flex_config/helpers.lua.
If there are columns that you would like to index this way submit either a pull request or create an issue requesting the change.
Caveats
Setting indexes is only relevant for the first import. When using --replication
these configurations only impact the initial import. Subsequent imports make no
attempt to verify / adjust database indexes.
The primary key cannot be omitted using this approach. The primary keys on
osm_id are created in post-processing SQL and is not able to be overridden
using this approach.
The simplest index specification file is shown above by defining the four (4)
empty sections define no indexes beyond the table's PRIMARY KEY on the osm_id
column.
Configure Postgres inside Docker
Add customizations with the -c switch, e.g. -c shared_buffers=1GB,
to customize Postgres' configuration at run-time in Docker.
See the osm2pgsql documentation
for recommendations on a server with 64 GB of RAM.
This docker run command has been tested with 16GB RAM and 4 CPU (8 threads) with the Colorado
subregion. Configuring Postgres in-Docker runs 7-14% faster than the default
Postgres in-Docker configuration.
docker run --name pgosm -d --rm \
    -v ~/pgosm-data:/app/output \
    -v /etc/localtime:/etc/localtime:ro \
    -e POSTGRES_PASSWORD=$POSTGRES_PASSWORD \
    -p 5433:5432 -d rustprooflabs/pgosm-flex \
    -c shared_buffers=512MB \
    -c work_mem=50MB \
    -c maintenance_work_mem=4GB \
    -c checkpoint_timeout=300min \
    -c max_wal_senders=0 -c wal_level=minimal \
    -c max_wal_size=10GB \
    -c checkpoint_completion_target=0.9 \
    -c random_page_cost=1.0
The docker exec command used for the timings.
time docker exec -it \
    pgosm python3 docker/pgosm_flex.py \
    --ram=8 \
    --region=north-america/us \
    --subregion=colorado \
    --layerset=basic \
    --pgosm-date=2021-10-08
Monitoring the import
You can track the query activity in the database being loaded using the
pg_stat_activity view from pg_catalog. Database connections use
application_name = 'pgosm_flex'.
SELECT *
    FROM pg_catalog.pg_stat_activity
    WHERE application_name = 'pgosm-flex'
;
Data Files
PgOSM Fle will automatically manage downloads of the appropriate data and .md5
files from the Geofabrik download server.
When using the default behavior, PgOSM Flex will automatically start downloading
the two necessary files:
<region/subregion>-latest.osm.pbf<region/subregion>-latest.osm.pbf.md5
The data path on the host machine is defined via the docker run command. This
documentation always uses ~/pgosm-data per the quick start.
docker run --name pgosm -d --rm \
    -v ~/pgosm-data:/app/output \
    ...
See the Selecting Region and Sub-region section for more about the default behavior.
There are two methods to override this default behavior: specify --pgosm-date
or use --input-file.
If you have manually saved files in the path used by PgOSM Flex using -latest
in the filename, they will be overwritten if you are not using one of the
methods described below.
Specific date with --pgosm-date
Use --pgosm-date to specify a specific date for the data. The date specified
must be in yyyy-mm-dd format.
This mode requires you have a valid .pbf and matching .md5 file in order to
function. The following example shows the docker exec command along with
a --pgosm-date defined.
docker exec -it \
    pgosm python3 docker/pgosm_flex.py \
    --ram=8 \
    --region=north-america/us \
    --subregion=district-of-columbia \
    --pgosm-date=2024-05-14
The output from running should confirm it finds and uses the file with the
specified date.
Remember, the paths reported from Docker (/app/output/) report the
container-internal path, not your local path on the host.
INFO:pgosm-flex:geofabrik:PBF File exists /app/output/district-of-columbia-2024-05-14.osm.pbf
INFO:pgosm-flex:geofabrik:PBF & MD5 files exist.  Download not needed
INFO:pgosm-flex:geofabrik:Copying Archived files
INFO:pgosm-flex:pgosm_flex:Running osm2pgsql
If a date is specified without matching file(s) it will raise an error and exit.
ERROR:pgosm-flex:geofabrik:Missing PBF file for 2024-05-15. Cannot proceed.
Specific input file with --input-file
The automatic Geofabrik download can be overridden by providing PgOSM Flex
with the path to a valid .osm.pbf file using --input-file.
This option overrides the default file handling, archiving, and MD5
checksum validation. With --input-file you can use a custom osm.pbf
you created, or use it to simply remove the need for an internet connection
from the instance running the processing.
Note: The
--regionoption is always required, the--subregionoption can be used with--input-fileto put the information in thesubregioncolumn ofosm.pgosm_flex.
Small area / custom extract
Some of the smallest subregions provided by Geofabrik are quite large compared
to the area of interest for a project.
The osmium tool makes it quick and easy to
extract a bounding box.
The following example extracts an area roughly around Denver, Colorado.
It takes about 3 seconds to extract the 3.2 MB denver.osm.pbf output from
the 239 MB input.
osmium extract --bbox=-105.0193,39.7663,-104.9687,39.7323 \
    -o denver.osm.pbf \
    colorado-2023-04-18.osm.pbf
The PgOSM Flex processing time for the smaller Denver region takes less than 20 seconds on a typical laptop, versus 11 minutes for all of Colorado.
docker exec -it \
    pgosm python3 docker/pgosm_flex.py \
    --ram=8 \
    --region=custom \
    --subregion=denver \
    --input-file=denver.osm.pbf \
    --layerset=everything
Querying with PgOSM Flex
Nested admin polygons
Nested admin polygons are stored in the table osm.place_polygon_nested.
The osm.build_nested_admin_polygons() to populate the table is defined in flex-config/place.sql,
the Docker process automatically runs it.
Can run quickly on small areas (Colorado), takes significantly longer on larger
areas (North America).
The Python script in the Docker image has a --skip-nested option to skip
running the function to populate the table. It can always be populated
at a later time manually using the function.
CALL osm.build_nested_admin_polygons();
When this process is running for a while it can be monitored with this query.
SELECT COUNT(*) AS row_count,
        COUNT(*) FILTER (WHERE nest_level IS NOT NULL) AS rows_processed
    FROM osm.place_polygon_nested
;
Quality Control Queries
Features not Loaded
The process of selectively load specific features and not others always has the chance of accidentally missing important data.
Running and examine tags from the SQL script db/qc/features_not_in_run_all.sql.
Run within psql (using \i db/qc/features_not_in_run_all.sql) or a GUI client
to explore the temp table used to return the aggregated results, osm_missing.
The table is a TEMP TABLE so will disappear when the session ends.
Example results from initial run (v0.0.4) showed some obvious omissions from the current layer definitions.
┌────────────────────────────────────────┬────────┐
│           jsonb_object_keys            │ count  │
╞════════════════════════════════════════╪════════╡
│ landuse                                │ 110965 │
│ addr:street                            │  89482 │
│ addr:housenumber                       │  89210 │
│ name                                   │  47151 │
│ leisure                                │  25351 │
│ addr:state                             │  19051 │
│ power                                  │  16933 │
│ addr:unit                              │  13973 │
│ building:part                          │  13773 │
│ golf                                   │  13427 │
│ railway                                │  13032 │
│ addr:city                              │  12426 │
│ addr:postcode                          │  12358 │
│ height                                 │  12113 │
│ building:colour                        │  11124 │
│ roof:colour                            │  11115 │
Unroutable routes
The helpers.lua methods are probably not perfect.
routable_foot()routable_cycle()routable_motor()
SELECT * FROM osm.road_line
    WHERE NOT route_foot AND NOT route_motor AND NOT route_cycle
;
Not all rows returned are errors.
highway = 'construction'is not necessarily determinate...
Relations missing from unitable
SELECT t.*
    FROM osm.tags t
    WHERE t.geom_type = 'R'
        AND NOT EXISTS (
            SELECT 1
            FROM osm.unitable u
            WHERE u.geom_type = t.geom_type AND t.osm_id = u.osm_id
);
Points of Interest (POIs)
PgOSM Flex loads an range of tags into a materialized view (osm.poi_all) for
easily searching POIs.
Line and polygon data is forced to point geometry using
ST_Centroid(). This layer duplicates a bunch of other more specific layers
(shop, amenity, etc.) to provide a single place for simplified POI searches.
Special layer included by layer sets run-all and run-no-tags.
See style/poi.lua for logic on how to include POIs.
The topic of POIs is subject and likely is not inclusive of everything that probably should be considered
a POI. If there are POIs missing
from this table please submit a new issue
with sufficient details about what is missing.
Pull requests also welcome! See the contributing section
for more information.
Counts of POIs by osm_type.
SELECT osm_type, COUNT(*)
    FROM osm.vpoi_all
    GROUP BY osm_type
    ORDER BY COUNT(*) DESC;
Results from Washington D.C. subregion (March 2020).
┌──────────┬───────┐
│ osm_type │ count │
╞══════════╪═══════╡
│ amenity  │ 12663 │
│ leisure  │  2701 │
│ building │  2045 │
│ shop     │  1739 │
│ tourism  │   729 │
│ man_made │   570 │
│ landuse  │    32 │
│ natural  │    19 │
└──────────┴───────┘
Includes Points (N), Lines (L) and Polygons (W).
SELECT geom_type, COUNT(*)
    FROM osm.vpoi_all
    GROUP BY geom_type
    ORDER BY COUNT(*) DESC;
┌───────────┬───────┐
│ geom_type │ count │
╞═══════════╪═══════╡
│ W         │ 10740 │
│ N         │  9556 │
│ L         │   202 │
└───────────┴───────┘
Meta table
PgOSM Flex tracks processing metadata in the osm.pgosm_flex table. The initial import
has osm2pgsql_mode = 'create', the subsequent update has
osm2pgsql_mode = 'append'.
SELECT osm_date, region, srid,
        pgosm_flex_version, osm2pgsql_version, osm2pgsql_mode
    FROM osm.pgosm_flex
;
┌────────────┬───────────────────────────┬──────┬────────────────────┬───────────────────┬────────────────┐
│  osm_date  │          region           │ srid │ pgosm_flex_version │ osm2pgsql_version │ osm2pgsql_mode │
╞════════════╪═══════════════════════════╪══════╪════════════════════╪═══════════════════╪════════════════╡
│ 2022-11-04 │ north-america/us-colorado │ 3857 │ 0.6.2-e1f140f      │ 1.7.2             │ create         │
│ 2022-11-25 │ north-america/us-colorado │ 3857 │ 0.6.2-e1f140f      │ 1.7.2             │ append         │
└────────────┴───────────────────────────┴──────┴────────────────────┴───────────────────┴────────────────┘
Routing with PgOSM Flex
This section provides details about routing with OpenStreetMap data loaded by PgOSM Flex. The primary focus of this documentation supports pgRouting 4.0 and newer, with legacy documentation available for older versions.
Prepare for Routing
The Postgres database needs to have both pgrouting
and convert extensions installed.
These extensions are both available in the PgOSM Flex Docker image, they are your
responsibility to install in external Postgres instances.
CREATE EXTENSION IF NOT EXISTS pgrouting;
CREATE EXTENSION IF NOT EXISTS convert;
Data File for Examples
This page provides a simple example of using OpenStreetMap roads
loaded with PgOSM Flex for routing.
The example uses the D.C. PBF included under tests/data/.
This specific data source is chosen to provide a consistent input
for predictable results. Even with using the same data and the
same code, some steps will have minor differences. These differences
are mentioned in those sections.
cd ~/pgosm-data

wget https://github.com/rustprooflabs/pgosm-flex/raw/main/tests/data/district-of-columbia-2021-01-13.osm.pbf
wget https://github.com/rustprooflabs/pgosm-flex/raw/main/tests/data/district-of-columbia-2021-01-13.osm.pbf.md5
Run docker exec to load the District of Columbia file from
January 13, 2021.
docker exec -it \
    pgosm python3 docker/pgosm_flex.py \
    --ram=8 \
    --region=north-america/us \
    --subregion=district-of-columbia \
    --pgosm-date=2021-01-13
Prepare Data and Route
It is highly recommended to use Routing with pgRouting 4.0. Not all steps are backward compatible with older versions of pgRouting. Table names, column names, and more have changed in recent versions.
The goal with the rewritten docs is improved understanding and usability.
Legacy Routing Instructions
If you must use an older version of pgRouting, see Routing with pgRouting 3. These are the legacy procedures that used pgRouting functions removed in pgRouting 4.0.
The significnat improvements with routing in PgOSM Flex are focused on pgRouting 4.0 and newer. The queries used in the latest versions are not fully backward compatible to older version of pgRouting.
The pre-4.0 documentation used naming conventions aimed at conforming to pgRouting's naming conventions surrounding the legacy functions.
Routing Roads
PgOSM Flex makes it easy to get started with routing with OpenStreetMap data and pgRouting. The best experience is with pgRouting 4.0 and newer. If you are using a pgRouting prior to 4.0 see Routing Roads: Legacy (pgRouting 3).
Prepare routing edge networks
You should have ran the steps in Prepare for Routing before continuing.
PgOSM Flex includes functions to prepare routing edge networks for data in
osm.road_line by running the appropriate procedure.
This procedure can take a while to run on larger regions, see the Timing section
below for more details.
CALL osm.routing_prepare_road_network();
You should see output similar to below. This example is to prepare the data for Colorado and took 8 minutes in this example. This step takes roughly 20 seconds to process for Washington D.C.
NOTICE:  Edge table table created
NOTICE:  Nearby table created
NOTICE:  Intersection table created
NOTICE:  Blades created
NOTICE:  Split edges created
NOTICE:  Edge data in route_edges_output temp table.
NOTICE:  Created table osm.routing_road_edge
NOTICE:  Created table osm.routing_road_vertex from edges.
NOTICE:  Edge table updated with vertex source/target details.
CALL
Time: 484294.179 ms (08:04.294)
The procedure creates two tables:
osm.routing_road_edgeosm.routing_road_vertex
These tables make up the routing network, built from data in osm.road_line.
The _vertex table has the points that can be used as start/end points for routes.
The _edge table has the edges (lines) that can be routed, along with their
costs and other access control measures.
Do not make customizations to the tables generated by the procedures without renaming the tables to avoid data loss.
Changes to OpenStreetMap data will not be reflected in the routing network until the procedure is ran again. This is not automated along with
--replication.
Routing Examples
The data preparation procedures above handle the steps to create a routable edge network with usable costs.
Determine route start and end
The following query identifies the vertex IDs from the osm.routing_road_vertex
table to use for start and end points.
The query uses an input set of points
created from specific longitude/latitude values.
Make note of the start_id and end_id values from this query
to use in subsequent queries. The following queries are setup to run
within DBeaver using :start_id and :end_id variables for dynamic querying.
The query with Longitude/Latitude simulates a user clicking in a GUI map to set start and end points. This type of interaction typically results in longitude and latitude values.
WITH s_point AS (
SELECT v.id AS start_id, v.geom
    FROM osm.routing_road_vertex v
    INNER JOIN (SELECT
        ST_Transform(ST_SetSRID(ST_MakePoint(-77.0211, 38.92255), 4326), 3857)
            AS geom
        ) p ON v.geom <-> p.geom < 20
    ORDER BY v.geom <-> p.geom
    LIMIT 1
), e_point AS (
SELECT v.id AS end_id, v.geom
    FROM osm.routing_road_vertex v
    INNER JOIN (SELECT
        ST_Transform(ST_SetSRID(ST_MakePoint(-77.0183, 38.9227), 4326), 3857)
            AS geom
        ) p ON v.geom <-> p.geom < 20
    ORDER BY v.geom <-> p.geom
    LIMIT 1
)
SELECT s_point.start_id, e_point.end_id
        , s_point.geom AS geom_start
        , e_point.geom AS geom_end
    FROM s_point, e_point
;
┌──────────┬────────┐
│ start_id │ end_id │
╞══════════╪════════╡
│    14630 │  14686 │
└──────────┴────────┘
Warning: The vertex IDs returned by the above query will vary. The pgRouting functions that generate this data do not guarantee data will always be generated in precisely the same order, causing these IDs to be different.
Route with Vertex Start/End IDs
Routing using PgOSM Flex's built-in travel-time calculations is as simple as running a function, passing in an ID for the start and end vertices.
SELECT *
    FROM osm.route_motor_travel_time(:vertex_start_id, :vertex_end_id)
;
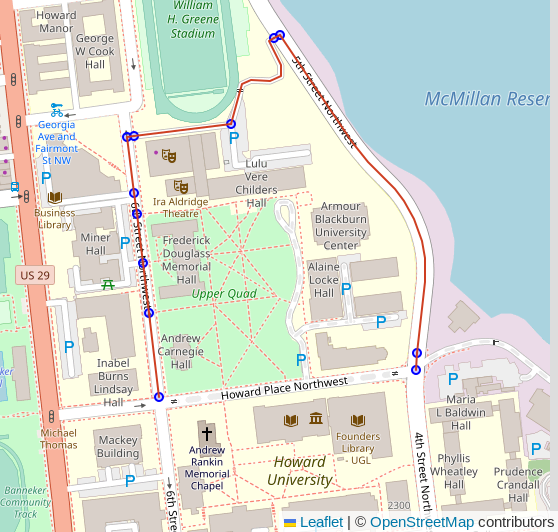
Beyond the route shown in the screenshot above the table below shows the route has 13 total segments and will take an estimated 73 seconds (1 minute, 13 seconds) to travel.
┌──────────┬────────────────────┐
│ segments │ total_cost_seconds │
╞══════════╪════════════════════╡
│       13 │  73.00033290095476 │
└──────────┴────────────────────┘
This routing function uses the cost_motor_forward_s
and cost_motor_reverse_s columns, combined with
the pgosm.road.traffic_penalty_normal column, to compute travel time.
The
pgosm.road.traffic_penalty_normalcolumn can be adjusted to influence the timing model. Other penalty / cost models can also be investigated.
Routing by Joining to Inputs
This next example expands beyond using singular routes to generating routes
based on a table of inputs. The osm.route_motor_travel_time() function is
a set-returning function and can be used in a lateral join.
Example Table - Random Points
For the purpose of this example, create a temp table route_vertex_combos
with a few start/end points to route between. The LIMIT 4 sets the number
of vertices to select. The final output is (N * N) - N potential routes
to generate.
DROP TABLE IF EXISTS route_vertex_combos;
CREATE TEMP TABLE route_vertex_combos AS
WITH vertices AS (
SELECT v.id AS vertex_id, v.geom
    FROM osm.routing_road_vertex v
    INNER JOIN osm.routing_road_edge e
        ON v.id IN (e.vertex_id_source, e.vertex_id_target)
        AND e.route_motor
    ORDER BY random()
    LIMIT 4 -- results in row count:  (N * N) - N
)
SELECT a.vertex_id AS vertex_id_start
        , b.vertex_id AS vertex_id_end
    FROM vertices a
    CROSS JOIN vertices b
    -- Don't route to yourself :)
    WHERE a.vertex_id <> b.vertex_id
;
Generate the Routes
The table if start/end points can be joined to the osm.route_motor_travel_time()
function.
DROP TABLE IF EXISTS public.my_random_routes;
CREATE TABLE public.my_random_routes AS
SELECT v.*, rte.*
    FROM route_vertex_combos v
    CROSS JOIN LATERAL osm.route_motor_travel_time(v.vertex_id_start, v.vertex_id_end) rte
;
Warning: The above query can take a long time to execute, depending on the number of inputs and the size of your routing network. It is often best to calculate routes in batches instead of a full join like shown in this simple example.
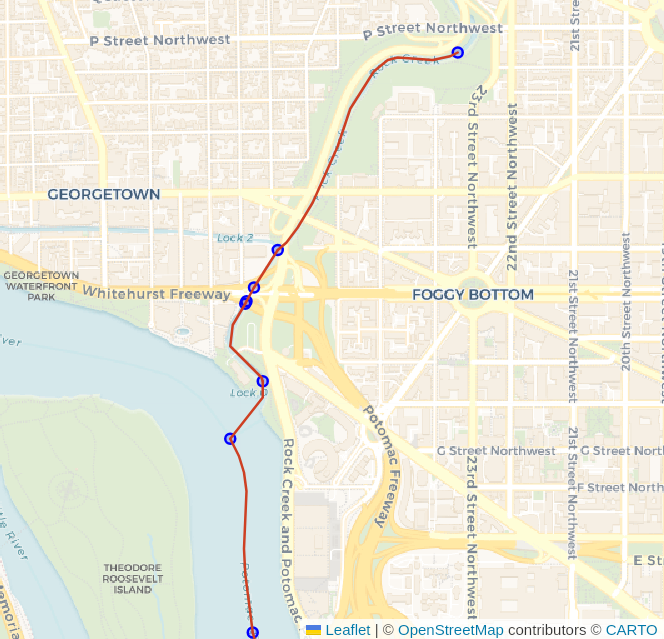
Routes can now be examined with costs often desired to be converted to minutes or hours. The example here shows an example of a long route taking a few hours.
SELECT vertex_id_start, vertex_id_end, segments
        , total_cost_seconds / 60 AS total_cost_minutes
        , total_cost_seconds / 60 / 60 AS total_cost_hours
        , geom
    FROM public.my_routes
    WHERE vertex_id_start = 1817591
        AND vertex_id_end = 17109
;
┌─────────────────┬───────────────┬──────────┬────────────────────┬───────────────────┐
│ vertex_id_start │ vertex_id_end │ segments │ total_cost_minutes │ total_cost_hours  │
╞═════════════════╪═══════════════╪══════════╪════════════════════╪═══════════════════╡
│         1817591 │         17109 │      783 │   350.379710135436 │ 5.839661835590601 │
└─────────────────┴───────────────┴──────────┴────────────────────┴───────────────────┘
Routing Data Preparation Timing
This section outlines a few timing references for routing preparation to help gauge how long this might take for your region's data. Note these are generic timings using the built-in database in the PgOSM Flex Docker image, without any tuning from default configuration. Your tuning and your hardware will influence these timings.
Note: Testing was done with PgOSM Flex 1.2.1 on a personal laptop.
- D.C.: 18 seconds
- Colorado: 11.5 minutes
The Colorado data set has 1.2M input roads resulting in 2.6M edges after splitting.
┌────────┬───────────────────┬─────────┐
│ s_name │      t_name       │  rows   │
╞════════╪═══════════════════╪═════════╡
│ osm    │ routing_road_edge │ 2560998 │
│ osm    │ road_line         │ 1189678 │
└────────┴───────────────────┴─────────┘
Routing with Water
PgOSM Flex makes it easy to get started with routing with OpenStreetMap data and pgRouting. The best experience is with pgRouting 4.0 and newer. If you are using a pgRouting prior to 4.0 see Routing Roads: Legacy (pgRouting 3).
Prepare routing edge networks
You should have ran the steps in Prepare for Routing before continuing.
PgOSM Flex includes functions to prepare routing edge networks for data in
osm.water_line by running the appropriate procedure.
These procedures can take a while to run on larger regions, see the Timing section
below for more details.
CALL osm.routing_prepare_water_network();
Routing with Water
PgOSM Flex also includes a procedure to prepare a routing network using
the osm.water_line table.
CALL osm.routing_prepare_water_network();
Find the vertex_id for start and end nodes, similar to approach above
with roads.
WITH s_point AS (
SELECT v.id AS start_id, v.geom
    FROM osm.routing_water_vertex v
    INNER JOIN (SELECT
        ST_Transform(ST_SetSRID(ST_MakePoint(-77.050625, 38.908953), 4326), 3857)
            AS geom
        ) p ON v.geom <-> p.geom < 200
    ORDER BY v.geom <-> p.geom
    LIMIT 1
), e_point AS (
SELECT v.id AS end_id, v.geom
    FROM osm.routing_water_vertex v
    INNER JOIN (SELECT
        ST_Transform(ST_SetSRID(ST_MakePoint(-77.055645, 38.888747), 4326), 3857)
            AS geom
        ) p ON v.geom <-> p.geom < 200
    ORDER BY v.geom <-> p.geom
    LIMIT 1
)
SELECT s_point.start_id, e_point.end_id
        , s_point.geom AS geom_start
        , e_point.geom AS geom_end
    FROM s_point, e_point
;
Route, using the directional approach.
SELECT d.*, n.geom AS node_geom, e.geom AS edge_geom
    FROM pgr_dijkstra(
        'SELECT e.edge_id AS id
                , e.vertex_id_source AS source
                , e.vertex_id_target AS target
                , e.cost_length_forward AS cost
                , e.cost_length_reverse AS reverse_cost
                , e.geom
            FROM osm.routing_water_edge e
            ',
            :start_id, :end_id, directed := True
        ) d
    INNER JOIN osm.routing_water_vertex n ON d.node = n.id
    LEFT JOIN osm.routing_water_edge e ON d.edge = e.edge_id
;
Challenge: Polygons with Water Routing
Waterway routing using lines only is often complicated by the nature of waterways and the way routes flow through steams and rivers (lines) and also through ponds and lakes (polygons). The data prepared by the above procedure only provides the line-based functionality.
The following image (source) visualizes the impact polygons can have on a line-only routing network for water routes.
See the Routing with Lines through Polygons blog post to explore one possible approach to solving this problem.
Routing Data and Process
This page describes some of the processes involved in the routing edge network.
Length Based Costs
The osm.routing_prepare_road_network procedure generates accurate cost_length
by casting data to GEOGRAPHY and generates cost_length_forward
and cost_length_reverse to natively support directionally-enforced routing
without additional steps.
This procedure was created as part of the migration to pgRouting 4.0, see #408 for notes about the initial migration.
⚠️ The routing procedures began to be added in PgOSM Flex 1.1.2 and continue to evolve. These procedures should be treated as a new feature with potential bugs lurking.
Costs Including One Way Restrictions
Most real-world routing examples need to be aware of one-way travel restrictions.
The oneway column in PgOSM Flex's road tables (e.g. osm.road_line) uses
osm2pgsql's direction data type.
This direction data type resolves to int2 in Postgres. Valid values are:
0: Not one way1: One way, forward travel allowed-1: One way, reverse travel allowedNULL: It's complicated. See #172.
Forward and reverse cost columns are calculated in the cost_length_forward
and cost_length_reverse columns within the osm.routing_prepare_road_network() procedure.
Travel Time Costs
With lengths and one-way already calculated per edge, speed limits can be used
to compute travel time costs. The osm.routing_prepare_road_network procedure
calculate travel times in seconds into two motor travel focused columns.
The osm.route_motor_travel_time() function uses these costs to compute travel times.
cost_motor_forward_scost_motor_reverse_s
The calculations use two sources of maxspeed to drive this logic.
The first source is the maxspeed value from each road segment from OpenStreetMap.
When that value is not set, the maxspeed value is used from the pgosm.road
lookup table based on osm_type (e.g. 'primary', 'residential')
packaged with PgOSM Flex.
The maxspeed is multipled by traffic_penalty_normal to calculate a more realistic
travel time. The traffic_penalty_normal values can be between 0.0 (block routing entirely)
to 1.0 (no penalty). These values are pre-set in the pgosm.road table and can
be adjusted before running the osm.routing_prepare_road_network procedure
to use your adjusted values.
In most common routing scenarios this will under-report travel times due to not considering for traffic signals, slowing down for corners, and traffic in general.
Customize the Edge Network Generation
The osm.routing_prepare_road_network and osm.routing_prepare_water_network
procedures are bundled in PgOSM Flex as a convenient and easy starting point
for realistic routing. They are not expected to be "perfect" or meet every routing
use case. Feel free to script out those procedures to modify for your own needs.
The source SQL for these procedures can be found
in the db/deploy
folder in the repository.
The main procedures to prepare the road and water networks leverage a common
procedure osm.routing_prepare_edge_network(). You most likely want to use this
procedure within your custom logic, it handles the nitty-gritty details of preparing
the edges/vertices. The outer procedures handle layer-specific columns, cost models,
and other minutia.
Routing Roads: Legacy (pgRouting 3)
Plan your Upgrade!
This page is a legacy documentation page for versions of pgRouting older than 4.0. This process requires more manual effort to setup and results in lower-quality routing networks compared to the latest procedures.
It is recommended to use pgRouting 4.0 or later, see the latest Routing Roads documentation.
⚠️ This page is no longer maintained.
This page will remain in the PgOSM documentation for the foreseeable future to ensure continuity for a transition to pgRouting 4.0.
Getting Started
Create the pgRouting extension.
CREATE EXTENSION IF NOT EXISTS pgrouting;
Clean the data
The following query does the initial cleanup for preparing OpenStreetMap roads for routing. The following code is converting multi-linestrings to standard linestrings for subsequent processing steps.
CREATE TABLE routing.road_line AS
WITH a AS (
-- Remove as many multi-linestrings as possible with ST_LineMerge()
SELECT osm_id, osm_type, maxspeed, oneway, layer,
        route_foot, route_cycle, route_motor, access,
        ST_LineMerge(geom) AS geom
    FROM osm.road_line
), extra_cleanup AS (
-- Pull out those that are still multi, use ST_Dump() to pull out parts
SELECT osm_id, osm_type, maxspeed, oneway, layer,
        route_foot, route_cycle, route_motor, access,
        (ST_Dump(geom)).geom AS geom
    FROM a
    WHERE ST_GeometryType(geom) = 'ST_MultiLineString'
), combined AS (
-- Combine two sources
SELECT osm_id, osm_type, maxspeed, oneway, layer,
        route_foot, route_cycle, route_motor, access,
        geom
    FROM a
    WHERE ST_GeometryType(geom) != 'ST_MultiLineString'
UNION
SELECT osm_id, osm_type, maxspeed, oneway, layer,
        route_foot, route_cycle, route_motor, access,
        geom
    FROM extra_cleanup
    -- Some data may be lost here if multi-linestring somehow
    -- persists through the extra_cleanup query
    WHERE ST_GeometryType(geom) != 'ST_MultiLineString'
)
-- Calculate a new surrogate ID for key
SELECT ROW_NUMBER() OVER (ORDER BY geom) AS id, *
    FROM combined
    ORDER BY geom
;
The above query creates the routing.road_line table. The next step
adds some database best practices to the table:
- Explain why a surrogate ID was added
- Primary key on the
idcolumn - Index on
osm_id
COMMENT ON COLUMN routing.road_line.id IS 'Surrogate ID, cannot rely on osm_id being unique after converting multi-linestrings to linestrings.';
ALTER TABLE routing.road_line
    ADD CONSTRAINT pk_routing_road_line PRIMARY KEY (id)
;
CREATE INDEX ix_routing_road_line_osm_id
    ON routing.road_line (osm_id)
;
To prepare the OpenStreetMap roads data for routing with the older pgRouting
installation, run the
pgRouting functions pgr_nodeNetwork(), pgr_createTopology(),
and pgr_analyzeGraph().
SELECT pgr_nodeNetwork('routing.road_line', 0.1, 'id', 'geom');
SELECT pgr_createTopology('routing.road_line_noded', 0.1, 'geom');
SELECT pgr_analyzeGraph('routing.road_line_noded', 0.1, 'geom');
Note: These functions were all removed in pgRouting 4.0.
Running the functions shown above will create two (2) new tables usable for routing.
routing.road_line_nodedrouting.road_line_noded_vertices_pgr
Timing note
The pgRouting functions shown in the preceding section can take a
long time to complete on larger regions.
It is often a good idea to run these from psql within a screen
emulator, such as screen or tmux that allow you to disconnect
from the long-running command without cancelling the query.
Determine Costs
Routing requires a cost in order to determine the best route to
take.
The following query creates a simple cost_length column to
the routing.road_line_noded table as a generated column.
This is a simple way to get started with costs for routing.
ALTER TABLE routing.road_line_noded
    ADD cost_length DOUBLE PRECISION NOT NULL
    GENERATED ALWAYS AS (ST_Length(geom))
    STORED;
Note: This is for non-directional routing. See the Routing
onewaysection below for more on directional routing.
Determine route start and end
The following query identifies the vertex IDs for a start and end point
to use for later queries. The query uses an input set of points
created from specific longitude/latitude values.
Use the start_id and end_id values from this query
in subsequent queries through the :start_id and :end_id variables
via DBeaver.
WITH s_point AS (
SELECT v.id AS start_id
    FROM routing.road_line_noded_vertices_pgr v
    INNER JOIN (SELECT
        ST_Transform(ST_SetSRID(ST_MakePoint(-77.0211, 38.92255), 4326), 3857)
            AS geom
        ) p ON v.the_geom <-> geom < 10
    ORDER BY v.the_geom <-> geom
    LIMIT 1
), e_point AS (
SELECT v.id AS end_id
    FROM routing.road_line_noded_vertices_pgr v
    INNER JOIN (SELECT
        ST_Transform(ST_SetSRID(ST_MakePoint(-77.0183, 38.9227), 4326), 3857)
            AS geom
        ) p ON v.the_geom <-> geom < 10
    ORDER BY v.the_geom <-> geom
    LIMIT 1
)
SELECT s_point.start_id, e_point.end_id
    FROM s_point, e_point
;
┌──────────┬────────┐
│ start_id │ end_id │
╞══════════╪════════╡
│    14630 │  14686 │
└──────────┴────────┘
Warning: The vertex IDs returned by the above query will vary. The pgRouting functions that generate this data do not guarantee data will always be generated in precisely the same order, causing these IDs to be different.
The vertex IDs returned were 14630 and 14686. These points
span a particular segment of road (osm_id = 6062791) that is tagged
as highway=residential and access=private.
This segment is used to illustrate how the calculated access
control columns, route_motor, route_cycle and route_foot,
can influence route selection.
SELECT *
    FROM routing.road_line
    WHERE osm_id = 6062791
;
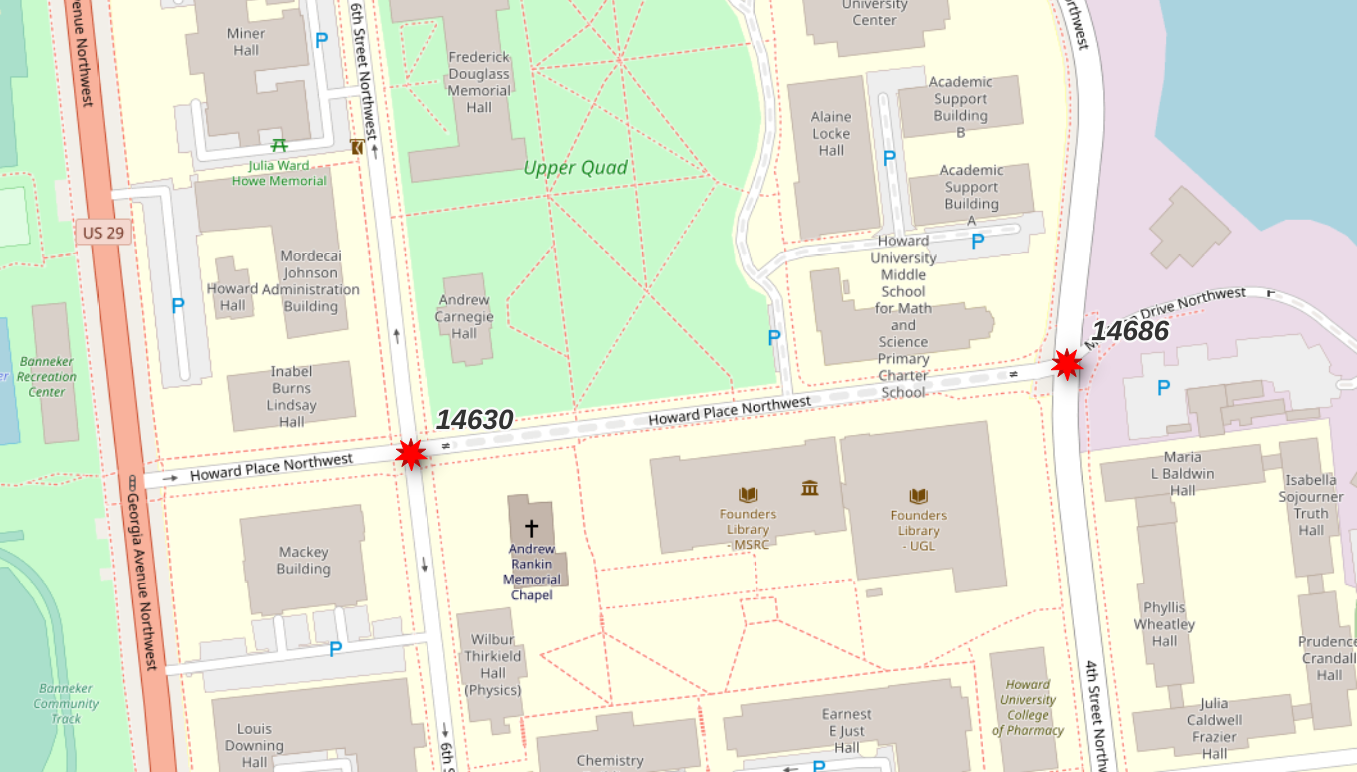
See
flex-config/helpers.luafunctions (e.g.routable_motor()) for logic behind access control columns.
Simple route
Using pgr_dijkstra() and no additional filters will
use all roads from OpenStreetMap without regard to mode of travel
or access rules.
This query picks a route that traverses sidewalks and
a section of road with the
access=private tag from OpenStreetMap.
The key details to focus on in the following queries
is the string containing a SQL query passed into the pgr_dijkstra()
function. This first example is a simple query from the
routing.road_line_noded table.
Note: These queries are intended to be ran using DBeaver. The
:start_idand:end_idvariables work within DBeaver, but not viapsqlor QGIS. Support in other GUIs is unknown at this time (PRs welcome!).
SELECT d.*, n.the_geom AS node_geom, e.geom AS edge_geom
    FROM pgr_dijkstra(
        'SELECT id, source, target, cost_length AS cost,
                geom
            FROM routing.road_line_noded
            ',
            :start_id, :end_id, directed := False
        ) d
    INNER JOIN routing.road_line_noded_vertices_pgr n ON d.node = n.id
    LEFT JOIN routing.road_line_noded e ON d.edge = e.id
;
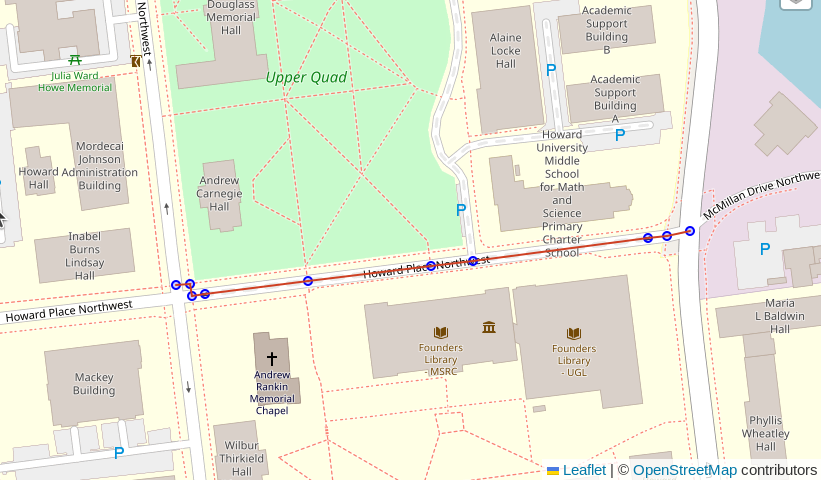
Route motorized
The following query modifies the query passed in to pgr_dijkstra()
to join the routing.road_line_noded table to the
routing.road_line table. This allows using attributes available
in the upstream table for additional routing logic.
The join clause includes a filter on the route_motor column.
From the comment on the osm.road_line.route_motor column:
"Best guess if the segment is route-able for motorized traffic. If access is no or private, set to false. WARNING: This does not indicate that this method of travel is safe OR allowed!"
Based on this comment, we can expect that adding AND r.route_motor
into the filter will ensure the road type is suitable for motorized
traffic, and it excludes routes marked private.
SELECT d.*, n.the_geom AS node_geom, e.geom AS edge_geom
    FROM pgr_dijkstra(
        'SELECT n.id, n.source, n.target, n.cost_length AS cost,
                n.geom
            FROM routing.road_line_noded n
            INNER JOIN routing.road_line r ON n.old_id = r.id
                    AND r.route_motor
            ',
            :start_id, :end_id, directed := False
        ) d
    INNER JOIN routing.road_line_noded_vertices_pgr n ON d.node = n.id
    LEFT JOIN routing.road_line_noded e ON d.edge = e.id
;
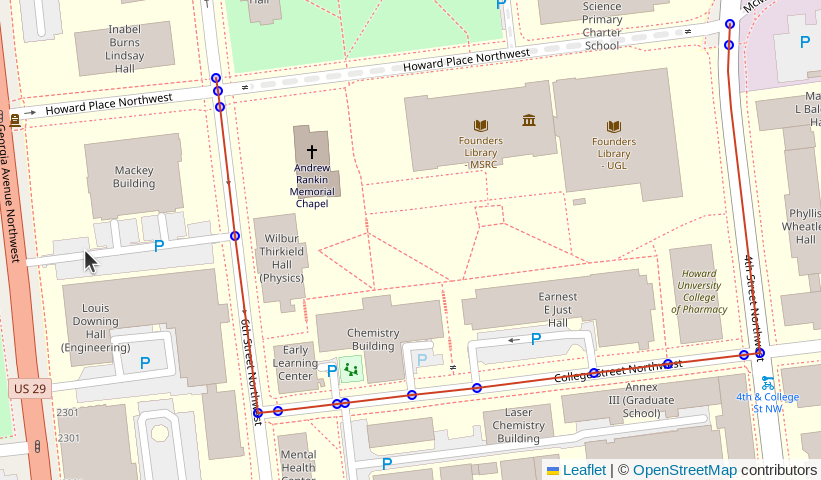
Route oneway
The route shown in the previous example now respects the access control and limits to routes suitable for motorized traffic. It, however, did not respect the one-way access control. The very first segment (top-left corner of screenshot) went the wrong way on a one-way street. This behavior is a result of the simple length-based cost model.
The oneway column in the road tables uses
osm2pgsql's direction data type which resolves to int2 in Postgres.
Valid values are:
0: Not one way1: One way, forward travel allowed-1: One way, reverse travel allowedNULL: It's complicated. See #172.
Assuming a noded roads table routing table, bring over the oneway detail
ALTER TABLE routing.road_line_noded
    ADD oneway INT2 NULL
;

UPDATE routing.road_line_noded rn
    SET oneway = r.oneway
    FROM routing.road_line r
    WHERE rn.old_id = r.id AND rn.oneway IS NULL
;
Forward and reverse costs
Calculate forward cost.
ALTER TABLE routing.road_line_noded
    DROP COLUMN IF EXISTS cost_length
;

-- Cost with oneway considerations
ALTER TABLE routing.road_line_noded
    ADD cost_length NUMERIC
    GENERATED ALWAYS AS (
        CASE WHEN oneway IN (0, 1) OR oneway IS NULL
                THEN ST_Length(geom)
            WHEN oneway = -1
                THEN -1 * ST_Length(geom)
            END
    )
    STORED
;
Reverse cost.
-- Reverse cost with oneway considerations
ALTER TABLE routing.road_line_noded
    ADD cost_length_reverse NUMERIC
    GENERATED ALWAYS AS (
        CASE WHEN oneway IN (0, -1) OR oneway IS NULL
                THEN ST_Length(geom)
            WHEN oneway = 1
                THEN -1 * ST_Length(geom)
            END
    )
    STORED
;
This query uses the new reverse cost column, and changes
directed from False to True.
SELECT d.*, n.the_geom AS node_geom, e.geom AS edge_geom
    FROM pgr_dijkstra(
        'SELECT n.id, n.source, n.target, n.cost_length AS cost,
                n.cost_length_reverse AS reverse_cost,
                n.geom
            FROM routing.road_line_noded n
            INNER JOIN routing.road_line r ON n.old_id = r.id
                    AND r.route_motor
            ',
            :start_id, :end_id, directed := True
        ) d
    INNER JOIN routing.road_line_noded_vertices_pgr n ON d.node = n.id
    LEFT JOIN routing.road_line_noded e ON d.edge = e.id
;
Processing Time
The purpose of this page is to provide a rough guideline of what to expect for how long PgOSM Flex processing will take. Two server sizes are used for this testing hosted by Digital Ocean. The larger size server has 8 vCPU and 64 GB RAM to match the target server size outlined in the osm2pgsql manual. The current matching Digital Ocean resource class is the Memory-Optimized with dedicated CPU resources. This comes with a 200 GB SSD. The cost for this class of instance is $0.500 / hour, or $336 / month. A good number of production Postgres instances can run on this hardware.
The smaller server size is a budget friendly 2 AMD vCPU and 2 GB RAM on shared CPU resources. The cost for this class of instance is $0.031 / hour, or $21 / month.
Versions Tested
Versions used for testing: PgOSM Flex 0.7.1 Docker image, based on the official PostGIS image with Postgres 15.2 / PostGIS 3.3. osm2pgsql 1.8.1.
Note: Postgres 15 made GIST indexes faster to create. Using an version prior to Postgres 14 will likely take longer.
Methodology
Create instance, Ubuntu 22.04.
sudo apt update \
    && sudo apt upgrade -y \
    && sudo apt autoremove -y \
    && sudo apt install -y apt-transport-https ca-certificates curl software-properties-common \
    && curl -fsSL https://download.docker.com/linux/ubuntu/gpg | sudo gpg --dearmor -o /usr/share/keyrings/docker-archive-keyring.gpg \
    && echo "deb [arch=$(dpkg --print-architecture) signed-by=/usr/share/keyrings/docker-archive-keyring.gpg] https://download.docker.com/linux/ubuntu $(lsb_release -cs) stable" | sudo tee /etc/apt/sources.list.d/docker.list > /dev/null \
    && sudo apt update \
    && sudo apt install docker-ce \
    && sudo reboot -h now
The timing for the first docker exec for each region was discarded as
it included the timing for downloading the PBF file.
Timings are an average of multiple recorded test runs over more than one day.
For example, the Norway region for the minimal layerset had two times: 5 min 35 seconds
and 5 minutes 37 seconds for an average of 5 minutes 36 seconds.
Time for the import step is reported using the Linux time command on the docker exec
step as shown in the following commands.
PostGIS Size reported is according to the meta-data in Postgres using this query.
SELECT d.oid, d.datname AS db_name,
        pg_size_pretty(pg_database_size(d.datname)) AS db_size
    FROM pg_catalog.pg_database d
    WHERE d.datname = current_database()
Commands
Set environment variables and start pgosm Docker container with configurations
set per the osm2pgsql tuning guidelines.
export POSTGRES_USER=postgres
export POSTGRES_PASSWORD=mysecretpassword

docker run --name pgosm -d --rm \
    -v ~/pgosm-data:/app/output \
    -v /etc/localtime:/etc/localtime:ro \
    -e POSTGRES_PASSWORD=$POSTGRES_PASSWORD \
    -p 5433:5432 -d rustprooflabs/pgosm-flex:0.7.1 \
    -c shared_buffers=1GB \
    -c work_mem=50MB \
    -c maintenance_work_mem=10GB \
    -c autovacuum_work_mem=2GB \
    -c checkpoint_timeout=300min \
    -c max_wal_senders=0 -c wal_level=minimal \
    -c max_wal_size=10GB \
    -c checkpoint_completion_target=0.9 \
    -c random_page_cost=1.0 \
    -c full_page_writes=off \
    -c fsync=off
WARNING: Setting
full_page_writes=offandfsync=offis part of the expert tuning for the best possible performance. This is deemed acceptable in this Docker container running--rm, obviously this container will be discarded immediately after processing. DO NOT use these configurations unless you understand and accept the risks of corruption.
Run PgOSM Flex within Docker. The first run time is discarded because the first run time includes time downloading the PBF file. Subsequent runs only include the time running the processing.
time docker exec -it \
    pgosm python3 docker/pgosm_flex.py \
    --ram=64 \
    --region=north-america/us \
    --subregion=colorado \
    --layerset=minimal
Layerset: Minimal
The minimal layer set only loads major roads, places, and POIs.
Timings with nested admin polygons and dumping the processed data to a .sql
file.
| Sub-region | PBF Size | PostGIS Size | .sql Size | Import Time |
|---|---|---|---|---|
| District of Columbia | 18 MB | 36 MB | 14 MB | 15.3 sec |
| Colorado | 226 MB | 181 MB | 129 MB | 1 min 23 sec |
| Norway | 1.1 GB | 618 MB | 489 MB | 5 min 36 sec |
| North America | 12 GB | 9.5 GB | 7.7 GB | 3.03 hours |
Timings skipping nested admin polygons the dump to .sql. This adds
--skip-dump --skip-nested to the docker exec process. The following
table compares the import time using these skips against the full times reported
above.
| Sub-region | Import Time (full) | Import Time (skips) |
|---|---|---|
| District of Columbia | 15.3 sec | 15.0 sec |
| Colorado | 1 min 23 sec | 1 min 21 sec |
| Norway | 5 min 36 sec | 5 min 12 sec |
| North America | 3.03 hours | 1.25 hours |
Layerset: Default
The default layer set....
Timings with nested admin polygons and dumping the processed data to a .sql
file.
| Sub-region | PBF Size | PostGIS Size | .sql Size | Import Time |
|---|---|---|---|---|
| District of Columbia | 18 MB | 212 MB | 160 MB | 53 sec |
| Colorado | 226 MB | 2.1 GB | 1.9 GB | 8 min 20 sec |
| Norway | 1.1 GB | 7.2 GB | 6.5 GB | 33 min 44 sec |
| North America | 12 GB | 98 GB | 55 GB | 8.78 hours |
Timings skipping nested admin polygons the dump to .sql. This adds
--skip-dump --skip-nested to the docker exec process. The following
table compares the import time using these skips against the full times reported
above.
| Sub-region | Import Time (full) | Import Time (skips) |
|---|---|---|
| District of Columbia | 53 sec | 51 sec |
| Colorado | 8 min 20 sec | 7 min 55 sec |
| Norway | 33 min 44 sec | 32 min 18 sec |
| North America | 8.78 hours | 6.58 hours |
Postgres permissions for PgOSM Flex
The quick start section showed how to get up and running using the Postgres instance within the PgOSM Flex docker image. Many production usage cases of PgOSM Flex prefer to connect the PgOSM Flex processing within Docker directly to an already running Postgres instances.
The first step to using PgOSM Flex with your own Postgres instance is to have a database already created, and a login role with proper permissions. The steps in this page prepare for the steps outlined in the Using External Postgres Connection section.
Create database and PostGIS
These first steps require elevated permissions within Postgres.
CREATE DATABASE requires the CREATEDB permission.
Creating the PostGIS extension requires
Postgres superuser permissions.
In the target Postgres instance, create your database.
CREATE DATABASE your_db_name;
Connect to your_db_name and create the PostGIS extension.
This is done along with the CREATE DATABASE since both steps
require the superuser role.
CREATE EXTENSION postgis;
Runtime permissions
Your target database needs to have an osm schema and the database user
requires the ability to create and populate tables in osm.
The following commands show one approach to granting permissions required for PgOSM Flex to run on an external database. Do not simply run this assuming this is the proper approach for your database security!
CREATE ROLE pgosm_flex WITH LOGIN PASSWORD 'mysecretpassword';
CREATE SCHEMA osm AUTHORIZATION pgosm_flex;
GRANT CREATE ON DATABASE your_db_name
    TO pgosm_flex;
GRANT CREATE ON SCHEMA public
    TO pgosm_flex;
These permissions should allow the full PgOSM Flex process to run.
GRANT CREATE ON DATABASE is required to allow the sqitch process to run and create the pgosm schema.
GRANT CREATE ON SCHEMA public is required for Postgres 15 and newer.
Reduced permissions
GRANT CREATE gives the pgosm_flex role far more permissions than
it really needs in many cases.
Running docker exec with --data-only skips these steps and would make the GRANT CREATE permission unnecessary for the pgosm_flex role.
It also is often desired to not make a login role the owner of database objects. This example reduces the scope of permissions.
CREATE ROLE pgosm_flex;
CREATE SCHEMA osm AUTHORIZATION pgosm_flex;
GRANT pgosm_flex TO your_login_role;
Using External Postgres Connection
Prepare the database and permissions as described in Postgres Permissions.
Set environment variables to define the connection. Create a file with the configuration options.
touch ~/.pgosm-db-myproject
chmod 0700 ~/.pgosm-db-myproject
nano ~/.pgosm-db-myproject
Put in the contents specific to your database connection.
export POSTGRES_USER=your_login_role
export POSTGRES_PASSWORD=mysecretpassword
export POSTGRES_HOST=your-host-or-ip
export POSTGRES_DB=your_db_name
export POSTGRES_PORT=5432
Env vars can be loaded using source.
source ~/.pgosm-db-myproject
Run the container with the additional environment variables.
docker run --name pgosm -d --rm \
    -v ~/pgosm-data:/app/output \
    -v /etc/localtime:/etc/localtime:ro \
    -e POSTGRES_USER=$POSTGRES_USER \
    -e POSTGRES_PASSWORD=$POSTGRES_PASSWORD \
    -e POSTGRES_HOST=$POSTGRES_HOST \
    -e POSTGRES_DB=$POSTGRES_DB \
    -e POSTGRES_PORT=$POSTGRES_PORT \
    -p 5433:5432 -d rustprooflabs/pgosm-flex
The docker exec command is the same as when using the internal Postgres instance.
docker exec -it \
    pgosm python3 docker/pgosm_flex.py \
    --ram=8 \
    --region=north-america/us \
    --subregion=district-of-columbia
Notes
The POSTGRES_HOST value is in relation to the Docker container.
Using localhost refers to the Docker container and will use the Postgres instance
within the Docker container, not your host running the Docker container.
Use ip addr to find your local host's IP address and provide that.
Setting POSTGRES_HOST to anything but localhost disables the drop/create database step. This means the target database must be created prior to running PgOSM Flex.
Data updates
Keeping OpenStreetMap data recent and up-to-date is important to many projects. However, this concept can mean very different things depending on the needs at hand.
There are three (3) main ways to run subsequent imports using PgOSM Flex.
Replication
Replication should be the default first choice to consider. Replication is best used when you only want to load one region of data and want to keep the region's data recent.
Pros:
- Fast updates after the first import
- Easy
Cons:
- Increased database size
- Little flexibility after initial import
Relocate data
Relocating data involves renaming the osm schema.
This allows PgOSM Flex to run in single-import mode, and to import any number
of different regions.
Pros:
- Simple
- Smaller database size per region
- Very customizable
Cons:
- Always single-import
- Duplicates a lot of data if using for snapshots over time on one region
Manual Updates
Manual Updates provide significant flexibility with a tradeoff in import performance
Pros:
- Very customizable
Cons:
- Very slow updates
- Poorly documented in PgOSM Flex
Using Replication
The --replication option of PgOSM Flex enables osm2pgsql-replication
to provide an easy and quick way to keep your OpenStreetMap data refreshed.
PgOSM Flex's --replication mode wraps around the osm2pgsql-replication package
included with osm2pgsql. The first time running an import with --replication
mode runs osm2pgsql normally, with --slim mode and without --drop.
After osm2pgsql completes, osm2pgsql-replication init ... is ran to setup
the DB for updates.
This mode of operation results in larger database as the intermediate osm2pgsql
tables (--slim) must be left in the database (no --drop).
Important: The original
--appendoption is now under--replication. The--appendoption was removed in PgOSM Flex 0.7.0. See #275 for context.
Use tagged version
When using replication you should pin your process to a specific PgOSM Flex version
in the docker run command. When upgrading to new versions,
be sure to check the release notes for manual upgrade steps for --replication.
The release notes for
PgOSM Flex 0.6.1
are one example.
The notes discussed in the release notes have reference SQL scripts
under db/data-migration folder.
WARNING - Due to the ability to configure custom layersets these data-migration scripts need manual review, and possibly manual adjustments for your specific database and process.
Not tested by make
The function exposed by --replication is not tested via PgOSM's Makefile.
Max connections
The other important change when using replication is to increase Postgres' max_connections.
See this discussion on osm2pgsql
for why this is necessary.
If using the Docker-internal Postgres instance this is done with -c max_connections=300
in the docker run command. External database connections must update this
in the appropriate postgresql.conf file.
export POSTGRES_USER=postgres
export POSTGRES_PASSWORD=mysecretpassword

docker run --name pgosm -d --rm \
    -v ~/pgosm-data:/app/output \
    -v /etc/localtime:/etc/localtime:ro \
    -e POSTGRES_PASSWORD=$POSTGRES_PASSWORD \
    -p 5433:5432 \
    -d rustprooflabs/pgosm-flex:0.10.0 \
        -c max_connections=300
Using --replication
Run the docker exec step with --replication.
docker exec -it \
    pgosm python3 docker/pgosm_flex.py \
    --ram=8 \
    --region=north-america/us \
    --subregion=district-of-columbia \
    --replication
Running the above command a second time will detect that the target database
has osm2pgsql-replication setup and load data via the defined replication
service.
One replication source
Replication with PgOSM Flex is limited to one data source per database.
While it is possible to load multiple regions,
each into their own schema
using --schema-name, replication via osm2pgsql-replication only supports
a single source. See this issue
for details. Possibly this ability will be supported in the future.
Resetting Replication
⚠️ WARNING! ⚠️ This section is only suitable for DEVELOPMENT databases. Do NOT USE on production databases!
Replication with PgOSM Flex --replication is simply a wrapper around the
osm2pgsql-replication tool. If you need to reload a development
database after using --replication you must remove the data from the
public.osm2pgsql_properties table. If you do not remove this data,
PgOSM Flex will detect the replication setup and attempt to update data, not
load fresh.
DELETE FROM public.osm2pgsql_properties;
WARNING: This process works as an okay hack when you are using the same layerset in the new import as was previously used. If you use a layerset with fewer tables, the original tables from the original layerset will persist and can cause confusion about what was loaded.
Relocate Data
This section describes how to relocate OpenStreetMap data loaded using PgOSM Flex. These instructions apply to using an external Postgres database in single-import mode.
Do not use these instructions when using
--append,--update, or--replication. Something will most likely break.
Why relocate data
There are two common reasons you may want to relocate data. The same approach works for both of these scenarios.
- Snapshots over time
- Different regions
If your goal is to have the latest data always available, consider using replication instead.
Rename Schema
PgOSM Flex always uses the osm schema.
The best way to relocate data is to simply rename the schema. This quickly moves
existing data out of the way for future PgOSM Flex use. The following query
renames osm to osm_2023_05.
ALTER SCHEMA osm RENAME TO osm_2023_05;
Using Update Mode
Running with --update enables using osm2pgsql's --append option to load a second
input file. The PgOSM Flex functionality uses --update create and --update append.
See the discussion in #275
for more context behind the intent for this feature.
Using --update append requires the initial import used --update create. Attempting
to use --update append without first using --update create results in the error:
"ERROR: This database is not updatable. To create an updatable database use --slim (without --drop)."
If your goal is to easily refresh the data for a single, standard region/sub-region
you should investigate the --replication feature. Using
replication is the easier and more efficient way to maintain data.
Note: This is not the
--appendoption that existed in PgOSM Flex 0.6.3 and prior.
Example
The following command uses --update create to load the district-of-columbia
sub-region. This example assumes you have set the environment variables and
have ran the docker container as shown in the Quick Start section.
docker exec -it \
    pgosm python3 docker/pgosm_flex.py \
    --ram=8 \
    --region=north-america/us \
    --subregion=district-of-columbia \
    --update create
The following loads a second sub-region (maryland) using --update append.
time docker exec -it \
    pgosm python3 docker/pgosm_flex.py \
    --ram=8 \
    --region=north-america/us \
    --subregion=maryland \
    --update append
Smaller test
This section has notes that probably belong elsewhere but I'm leaving them here for now. They were initially helpful for testing the logic for this functionality.
Put the following into ~/pgosm-data/extracts/colorado-extract.json.
{
    "directory": "/home/ryanlambert/pgosm-data/",
    "extracts": [
        {
            "output": "colorado-boulder-latest.osm.pbf",
            "description": "Area extracted around Boulder, Colorado",
            "bbox": {
                "left": -105.30,
                "right": -105.20,
                "top": 40.07,
                "bottom": 39.98
            }
        },
        {
            "output": "colorado-longmont-latest.osm.pbf",
            "description": "Area extracted around Longmont, Colorado",
            "bbox": {
                "left": -105.15,
                "right": -105.05,
                "top": 40.21,
                "bottom": 40.12
            }
        }
    ]
}
Create Boulder and Longmont extracts using osmium extract.
osmium extract -c extracts/colorado-extracts.json colorado-2022-12-27.osm.pbf
ryanlambert@tag201:~/pgosm-data$ ls -alh | grep boulder
-rw-rw-r--  1 ryanlambert ryanlambert 2.4M Dec 27 14:31 colorado-boulder-latest.osm.pbf
ryanlambert@tag201:~/pgosm-data$ ls -alh | grep longmont
-rw-rw-r--  1 ryanlambert ryanlambert 988K Dec 27 14:31 colorado-longmont-latest.osm.pbf
Takes 11 seconds.
docker exec -it \
    pgosm python3 docker/pgosm_flex.py \
    --ram=8 \
    --region=north-america/us \
    --subregion=colorado-longmont --input-file colorado-longmont-latest.osm.pbf \
    --update create
Takes 2 minutes.
docker exec -it \
    pgosm python3 docker/pgosm_flex.py \
    --ram=8 \
    --region=north-america/us \
    --subregion=colorado-boulder --input-file colorado-boulder-latest.osm.pbf \
    --update append
QGIS Styles for PgOSM Flex
If you use QGIS to visualize OpenStreetMap, there are a few basic
styles using the public.layer_styles table created by QGIS.
This data is loaded by default. Run PgOSM Flex with --data-only to skip loading
this data.
QGIS can save its styling information directly in a table in the Postgres database
using a table public.layer_styles.
SELECT f_table_catalog, f_table_schema, f_table_name, stylename,
        useasdefault, description
    FROM public.layer_styles
;
Force Load
Added in PgOSM Flex 0.8.1.
⚠️ Danger ahead ⚠️
The examples in this section can do bad things in production setups.
The --force feature exists for development use cases.
Most users should consider moving old data out of the way using the methods described in the relocate data.
PgOSM Flex Tries to be Safe
PgOSM Flex attempts to avoid accidentally overwriting existing data
when using a database
external to the PgOSM Flex Docker container.
It does this by checking the data stored in the osm.pgosm_flex table.
The
--forcefeature only applies to external database connections. The internal database is always dropped and recreated when using the built-in database.
This section assumes you have followed the instructions on the
Postgres External section including
setting up permissions.
The protection against overwriting data is built into the pgosm_flex.py logic
ran via docker exec. With PgOSM Flex 0.8.1 and later, running the following
command twice in a row will result in an
docker exec -it \
    pgosm python3 docker/pgosm_flex.py \
    --ram=8 \
    --region=north-america/us \
    --subregion=district-of-columbia
Running the docker exec step a second time would result in
the following error.
2023-05-29 08:08:19,495:ERROR:pgosm-flex:import_mode:Prior data exists in the osm schema and --force was not used.
2023-05-29 08:08:19,495:ERROR:pgosm-flex:pgosm_flex:Not okay to run PgOSM Flex. Exiting
Using --force
To overwrite and reload data, use the --force option with the docker exec
command.
docker exec -it \
    pgosm python3 docker/pgosm_flex.py \
    --ram=8 \
    --region=north-america/us \
    --subregion=district-of-columbia \
    --force
Using --force outputs the following message during import when prior data exists.
2023-05-14 15:09:12,457:WARNING:pgosm-flex:import_mode:Using --force, kiss existing data goodbye
Only overwrites tables in new --layerset
Using --force can cause unexpected mismatches between tables when different
layersets are used. This section illustrates this problem.
First run docker exec as shown in the quick start guide.
This loads the District of Columbia subregion with the default layerset.
docker exec -it \
    pgosm python3 docker/pgosm_flex.py \
    --ram=8 \
    --region=north-america/us \
    --subregion=district-of-columbia
Now run again with --force and --layerset=minimal. A different region
(Rhode Island) is also used to help illustrate the problem.
docker exec -it \
    pgosm python3 docker/pgosm_flex.py \
    --ram=8 \
    --region=north-america/us \
    --subregion=rhode-island \
    --force \
    --layerset=minimal
The following image shows that while the osm.place_polgyon data is correctly loaded
with the Rhode Island region's data, the osm.building_point retained the
data from Washington D.C. This happens because --force only allows PgOSM Flex
to overwrite data as defined by the --layerset option. If tables were created
by layers not used in the latest --layerset, they will be left in the database
as-is.

While this problem is most apparent when using different regions, it can also be a problem with the same region if a user querying the data assumes all tables were updated at the same time.
Projects using PgOSM Flex
Do you have a project using PgOSM Flex? Submit a PR with details!
- geoshiny - create highly customized maps - github repo
- eBook - Mastering PostGIS and OpenStreetMap by Ryan Lambert - website
- Geo Faker - documentation - github
PgOSM Flex Docker
This page outlines how and when images are built and pushed to Docker Hub.
Docker image background
The PgOSM Flex Docker image uses main Postgres image via the main PostGIS image as starting point. Those repositories have detailed instructions on using and customizing the core Postgres functionality.
Images on Docker Hub
There are three main types of images pushed to Docker Hub.
latestx.x.xdev
Which branch is best for you depends on how you use the data from PgOSM Flex.
When to use tagged (x.x.x) release
Tagged releases are the most stable option and are recommended if you are
using --replication or --update mode.
Tagged releases are built with the latest versions of all key software, e.g. Postgres,
PostGIS and osm2pgsql, and their dependencies. These tagged images (e.g. 0.6.2)
are typically built at the time the tag is added to GitHub, and are (typically)
not rebuilt.
PgOSM Flex is still evolving on a regular basis. This means new tagged releases are coming out as activity happens in the project.
When to use latest
If you run PgOSM Flex without --replication or --update mode this image is
generally stable and includes the latest features.
The latest Docker image could include changes that
require manual changes in Postgres. Those changes are documented in the release notes,
for example, see "Notes for --append users" in 0.6.1 release notes.
When to use dev
The dev image exists when there's something worth testing. Typically the dev
image is deleted from Docker Hub as functionality is worked into the latest image.
Building the image
Build latest. Occasionally run with --no-cache to force some software updates.
docker build -t rustprooflabs/pgosm-flex .
Building the Docker image on Apple Silicon (M*) requires forcing the linux/amd64 platform
using --platform=linux/amd64. See https://github.com/postgis/docker-postgis/issues/216
for status on having arm64 native image.
docker build --platform=linux/amd64 -t rustprooflabs/pgosm-flex .
Tag with version.
docker build -t rustprooflabs/pgosm-flex:0.10.0 .
Push to Docker Hub.
docker push rustprooflabs/pgosm-flex:latest
docker push rustprooflabs/pgosm-flex:0.10.0
Ensure updates
To be certain the latest images are being used and latest
software is installed, pull the latest PostGIS image and build
the PgOSM Flex image using --no-cache.
docker pull postgis/postgis:16-3.4
docker build --no-cache -t rustprooflabs/pgosm-flex:dev .
Building PgOSM Flex from an osm2pgsql feature branch
There are times it is helpful to build the PgOSM Flex Docker image with a
specific feature branch. To do this, change the OSM2PGSQL_BRANCH
and/or OSM2PGSQL_REPO arguments as necessary at the beginning of the Dockerfile.
The production setup looks like the following example.
ARG OSM2PGSQL_BRANCH=master
ARG OSM2PGSQL_REPO=https://github.com/osm2pgsql-dev/osm2pgsql.git
To test the feature branch associated with
osm2pgsql #2212
the updated version was set like the following example.
This changes the OSM2PGSQL_BRANCH to check-date-on-replication-init
and changes the username in the OSM2PGSQL_REPO to lonvia.
ARG OSM2PGSQL_BRANCH=check-date-on-replication-init
ARG OSM2PGSQL_REPO=https://github.com/lonvia/osm2pgsql.git
Testing PgOSM Flex
The Makefile at the root of this project tests many core aspects of
PgOSM Flex's functionality. It builds the Docker image, tests a few usage
scenarios (including --input-file) and runs both Python unit tests
and Data Import tests. The data import tests verify row counts by
osm_type and osm_subtype of many tables.
Run all tests
To run all tests run make from the project's root directory.
make
A simplified usage for quicker testing during development.
make docker-exec-default unit-tests
Data Tests
Under pgosm-flex/tests. The run-output-tests.sh script is ran by
running make. The script loops over the .sql scripts under
pgosm-flex/tests/sql/, runs the queries via psql using
--no-psqlrc -tA and compares the output from the query against the
expected output saved under pgosm-flex/tests/expected.
Running make docker-exec-default unit-tests should finish with this line
reporting data tests completed successfully.
Data output tests completed successfully.
If something in the Lua styles or SQL post-processing changes, the intention is
they will be reported by these tests. Note the second line of this section
reports the docker exec command to run in order to see the changes to the
data tests.
FAILED TEST: sql/shop_polygon_osm_type_subtype_count.sql - See tmp/shop_polygon_osm_type_subtype_count.diff
  docker exec -it pgosm /bin/bash -c "cat /app/tests/tmp/shop_polygon_osm_type_subtype_count.diff "
One or more data output tests failed.
The output from the docker exec command looks like the following.
Note the - and + lines showing the count of records with
osm_type='shop' and osm_subtype='chemist' changed from 1 to 2.
diff --git a/expected/shop_polygon_osm_type_subtype_count.out b/tmp/shop_polygon_osm_type_subtype_count.out
index 75c16c3..2385d8d 100644
--- a/expected/shop_polygon_osm_type_subtype_count.out
+++ b/tmp/shop_polygon_osm_type_subtype_count.out
@@ -12,7 +12,7 @@ shop|books|1
 shop|car|4
 shop|car_parts|3
 shop|car_repair|7
-shop|chemist|1
+shop|chemist|2
 shop|clothes|8
 shop|convenience|35
 shop|copyshop|1
Add / Update Data Tests
This section provides guidance to adding/updating data tests for PgOSM Flex.
The SQL file to run is under tests/sql/*.sql, the expected results are saved
under tests/expected/*.out.
Load Test Data
Load data/district-of-columbia-2021-01-13.osm.pbf with run-all
before running these tests.
PBF sourced from Geofabrik's download service on January 13, 2021.
Craft Test Query
Connect to the PgOSM Flex database with data/district-of-columbia-2021-01-13.osm.pbf
loaded. Write the query that provide results to test for.
Important: Results must be ordered using COLLATE "C" to ensure consistent
ordering across systems. For example it should be written like this:
SELECT osm_type COLLATE "C", COUNT(*)
    FROM osm.amenity_point
    GROUP BY osm_type COLLATE "C"
    ORDER BY osm_type COLLATE "C"
;
Not like this:
SELECT osm_type, COUNT(*)
    FROM osm.amenity_point
    GROUP BY osm_type
    ORDER BY osm_type
;
Create Expected Output
To create new tests, or to update existing tests use psql --no-psqlrc -tA <details>.
Example for amenity count of osm_type.
Assuming Quick Start instructions, set the env var for the Postgres connection first.
export PGOSM_CONN=postgresql://postgres:mysecretpassword@localhost:5433/pgosm
Run the query, save the output.
psql --no-psqlrc -tA  \
    -d $PGOSM_CONN \
     -f sql/amenity_osm_type_count.sql \
     > expected/amenity_osm_type_count.out
Validate New Tests
Ensure the data tests work and are reported if values change via make.
The best way to ensure the test is working is manually change one value in the
generated .out file which should cause the following error message.
Setting the .out data back to right should return the message back to successful.
FAILED TEST: sql/shop_polygon_osm_type_subtype_count.sql - See tmp/shop_polygon_osm_type_subtype_count.diff
  docker exec -it pgosm /bin/bash -c "cat /app/tests/tmp/shop_polygon_osm_type_subtype_count.diff "
One or more data output tests failed.
Create PBFs for areas w/ Failures
Identify a feature related to the issue and load small region around into JOSM (as if making an edit).
Use JOSM's "Save As..." to save the <region-failure-name>.osm file.
Use osmium-tool (https://osmcode.org/osmium-tool/manual.html)
to convert to .pbf format.
osmium cat  <region-failure-name>.osm -o <region-failure-name>.osm.pbf
mv <region-failure-name>.osm.pbf ~/git/pgosm-flex/tests/data/extra-regions/
Test for import failures
Test for specific regions that have had failures due to unusual tags and/or bugs in PgOSM-Flex.
Run extra region load tests.
export PGOSM_CONN=pgosm_tests
export PGOSM_CONN_PG=postgres
./run-extra-loads.sh
FIXME: At this time the
run-extra-loads.shscript is not ran automatically. There are not any usage notes covering those random side tests.
Python unit tests
The Python unit tests are under pgosm-flex/docker/tests/. These tests use
Python's unittest module. The make process runs these using
coverage run ... and coverage report ....
See the Makefile
for exact implementation.
These unit tests cover specific logic and functionality to how PgOSM Flex's Python program runs.
What is not tested
Functionality of osm2pgsql-replication to actually update data. Challenge
is that to test this it requires having a recent .osm.pbf file for the initial
import. Attempting to use the test D.C. file used for all other testing
(from January 13, 2021), the initial import works, however a subsequent
refresh fails.
2023-01-29 08:11:35,553:INFO:pgosm-flex:helpers:2023-01-29 08:11:35 [INFO]: Using replication service 'http://download.geofabrik.de/north-america/us/district-of-columbia-updates'. Current sequence 2856 (2021-01-13 14:42:03-07:00).
2023-01-29 08:11:36,866:INFO:pgosm-flex:helpers:Traceback (most recent call last):
2023-01-29 08:11:36,866:INFO:pgosm-flex:helpers:File "/usr/local/bin/osm2pgsql-replication", line 556, in <module>
2023-01-29 08:11:36,866:INFO:pgosm-flex:helpers:sys.exit(main())
2023-01-29 08:11:36,866:INFO:pgosm-flex:helpers:File "/usr/local/bin/osm2pgsql-replication", line 550, in main
2023-01-29 08:11:36,867:INFO:pgosm-flex:helpers:return args.handler(conn, args)
2023-01-29 08:11:36,867:INFO:pgosm-flex:helpers:File "/usr/local/bin/osm2pgsql-replication", line 402, in update
2023-01-29 08:11:36,867:INFO:pgosm-flex:helpers:endseq = repl.apply_diffs(outhandler, seq + 1,
2023-01-29 08:11:36,867:INFO:pgosm-flex:helpers:File "/usr/local/lib/python3.9/dist-packages/osmium/replication/server.py", line 177, in apply_diffs
2023-01-29 08:11:36,868:INFO:pgosm-flex:helpers:diffs = self.collect_diffs(start_id, max_size)
2023-01-29 08:11:36,868:INFO:pgosm-flex:helpers:File "/usr/local/lib/python3.9/dist-packages/osmium/replication/server.py", line 143, in collect_diffs
2023-01-29 08:11:36,868:INFO:pgosm-flex:helpers:left_size -= rd.add_buffer(diffdata, self.diff_type)
2023-01-29 08:11:36,868:INFO:pgosm-flex:helpers:RuntimeError: gzip error: inflate failed: incorrect header check
2023-01-29 08:11:36,890:WARNING:pgosm-flex:pgosm_flex:Failure. Return code: 1
2023-01-29 08:11:36,890:INFO:pgosm-flex:pgosm_flex:Skipping pg_dump
2023-01-29 08:11:36,890:WARNING:pgosm-flex:pgosm_flex:PgOSM Flex completed with errors. Details in output
Developing QGIS Styles
This page explains how to maintain QGIS layer styles.
Add/Update existing records
The QGIS table does not include UNIQUE constraints, so using Postgres' UPSERT is
not available by default.
Add new records from staging, based on object names.
INSERT INTO public.layer_styles
    (f_table_catalog, f_table_schema, f_table_name,
     f_geometry_column, stylename, styleqml, stylesld,
     useasdefault, description, "owner", ui, update_time)
SELECT new.f_table_catalog, new.f_table_schema, new.f_table_name,
     new.f_geometry_column, new.stylename, new.styleqml, new.stylesld,
     new.useasdefault, new.description, new."owner", new.ui, new.update_time
    FROM public.layer_styles_staging new
    LEFT JOIN public.layer_styles ls
        ON new.f_table_catalog = ls.f_table_catalog
            AND new.f_table_schema = ls.f_table_schema
            AND new.f_table_name = ls.f_table_name
            AND new.stylename = ls.stylename
    WHERE ls.id IS NULL
;
To update existing styles.
UPDATE public.layer_styles ls
    SET f_geometry_column = new.f_geometry_column,
        styleqml = new.styleqml,
        stylesld = new.stylesld,
        useasdefault = new.useasdefault,
        description = new.description,
        "owner" = new."owner",
        ui = new.ui,
        update_time = new.update_time
    FROM public.layer_styles_staging new
    WHERE new.f_table_catalog = ls.f_table_catalog
        AND new.f_table_schema = ls.f_table_schema
        AND new.f_table_name = ls.f_table_name
        AND new.stylename = ls.stylename
;
Cleanup the staging table.
DELETE FROM public.layer_styles_staging;
Updating Style .sql
To update (or create new) the .sql file with styles.
Load into _staging table so restoring the data puts it back in the same place.
Optionally add a WHERE clause to only export certain styles.
You may want to update the owner field.
INSERT INTO public.layer_styles_staging
SELECT * FROM public.layer_styles;

UPDATE public.layer_styles_staging
    SET owner = 'rustprooflabs'
    WHERE owner != 'rustprooflabs'
;
pg_dump --no-owner --no-privileges --data-only --table=public.layer_styles_staging \
    -d pgosm \
    -f layer_styles.sql
Cleanup the staging table.
DELETE FROM public.layer_styles_staging;
Troubleshoot errors in osm2pgsql processing
This section contains rough notes about how to troubleshoot errors in PgOSM Flex.
Reduce --ram
If you encounter an unusual failure during the osm2pgsql step of PgOSM Flex,
try reducing the --ram value. Choosing a --ram option too high can cause
the process to fail with a variety of unexpected errors. If that isn't the problem,
continue reading.
Docker logs
Output such as this.
2023-02-26 22:14:31,760:INFO:pgosm-flex:helpers:Processing: Node(10k 10.0k/s) Way(0k 0.00k/s) Relation(0Processing: Node(84760k 277.9k/s) Way(0k 0.00k/s) Relation(0 0.0/s)
2023-02-26 22:14:31,774:ERROR:pgosm-flex:pgosm_flex:Failed to run osm2pgsql. Return code: -9
Failed to run osm2pgsql. Return code: -9 - Check the log output for details
Checking logs from Docker might shed light on issue.
docker logs pgosm
2023-02-26 22:14:31.777 UTC [114] LOG:  incomplete message from client
2023-02-26 22:14:31.777 UTC [114] CONTEXT:  COPY tags, line 1
2023-02-26 22:14:31.777 UTC [114] STATEMENT:  COPY "osm"."tags" ("geom_type","osm_id","tags") FROM STDIN
2023-02-26 22:14:31.807 UTC [114] ERROR:  unexpected EOF on client connection with an open transaction
2023-02-26 22:14:31.807 UTC [114] CONTEXT:  COPY tags, line 1
2023-02-26 22:14:31.807 UTC [114] STATEMENT:  COPY "osm"."tags" ("geom_type","osm_id","tags") FROM STDIN
2023-02-26 22:14:31.812 UTC [114] FATAL:  terminating connection because protocol synchronization was lost
2023-02-26 22:14:31.822 UTC [114] LOG:  could not send data to client: Broken pipe
Troubleshoot within Docker
Enter the docker container into /bin/bash.
docker exec -it pgosm /bin/bash
Set environment variables required for PgOSM Flex's operation.
export PGOSM_CONN=postgresql://postgres:mysecretpassword@localhost:5432/pgosm?application_name=pgosm-flex
export PGOSM_REPLICATION=False
export PGOSM_IMPORT_UUID=this-is-not-a-real-uuid
export PGOSM_LAYERSET=minimal
Run osm2pgsql manually. Start with a simple operation shown below,
consider adding adding -v and/or --log-sql-data to the osm2pgsql command
to dig deeper.
osm2pgsql -d $PGOSM_CONN \
    --create --output=flex --style=./run.lua \
    /app/output/district-of-columbia-latest.osm.pbf
Configure more things
docker run --name pgosm -d --rm \
    -v ~/pgosm-data:/app/output \
    -v /etc/localtime:/etc/localtime:ro \
    -e POSTGRES_PASSWORD=$POSTGRES_PASSWORD \
    -p 5433:5432 -d rustprooflabs/pgosm-flex \
    -c shared_buffers=1GB \
    -c work_mem=50MB \
    -c maintenance_work_mem=10GB \
    -c autovacuum_work_mem=2GB \
    -c checkpoint_timeout=300min \
    -c max_wal_senders=0 -c wal_level=minimal \
    -c max_wal_size=10GB \
    -c checkpoint_completion_target=0.9 \
    -c random_page_cost=1.0 \
    -c full_page_writes=off \
    -c fsync=off \
    -c log_statement=all \
    -c log_duration=on